Home / Blog / Guides

iOS vs Android: Unraveling the Digital Dilemma.

Deciding between iOS and Android is a significant tech decision. Both platforms have their merits, and the optimal choice often hinges on individual needs and preferences. Here’s an in-depth comparison.

iOS: The Elegance of Integration

Ease of Use:

1. It just works!

Renowned for its straightforward interface, iOS is especially beginner-friendly. Apple designs its interface with simplicity in mind, ensuring that even those new to smartphones find it easy to navigate.

2. Seamless connection

The seamless connectivity across Apple devices enhances its user experience. Devices like the iPhone, iPad, MacBook, and Apple Watch work together effortlessly, sharing data and allowing users to switch between them with ease.

Accessibility:

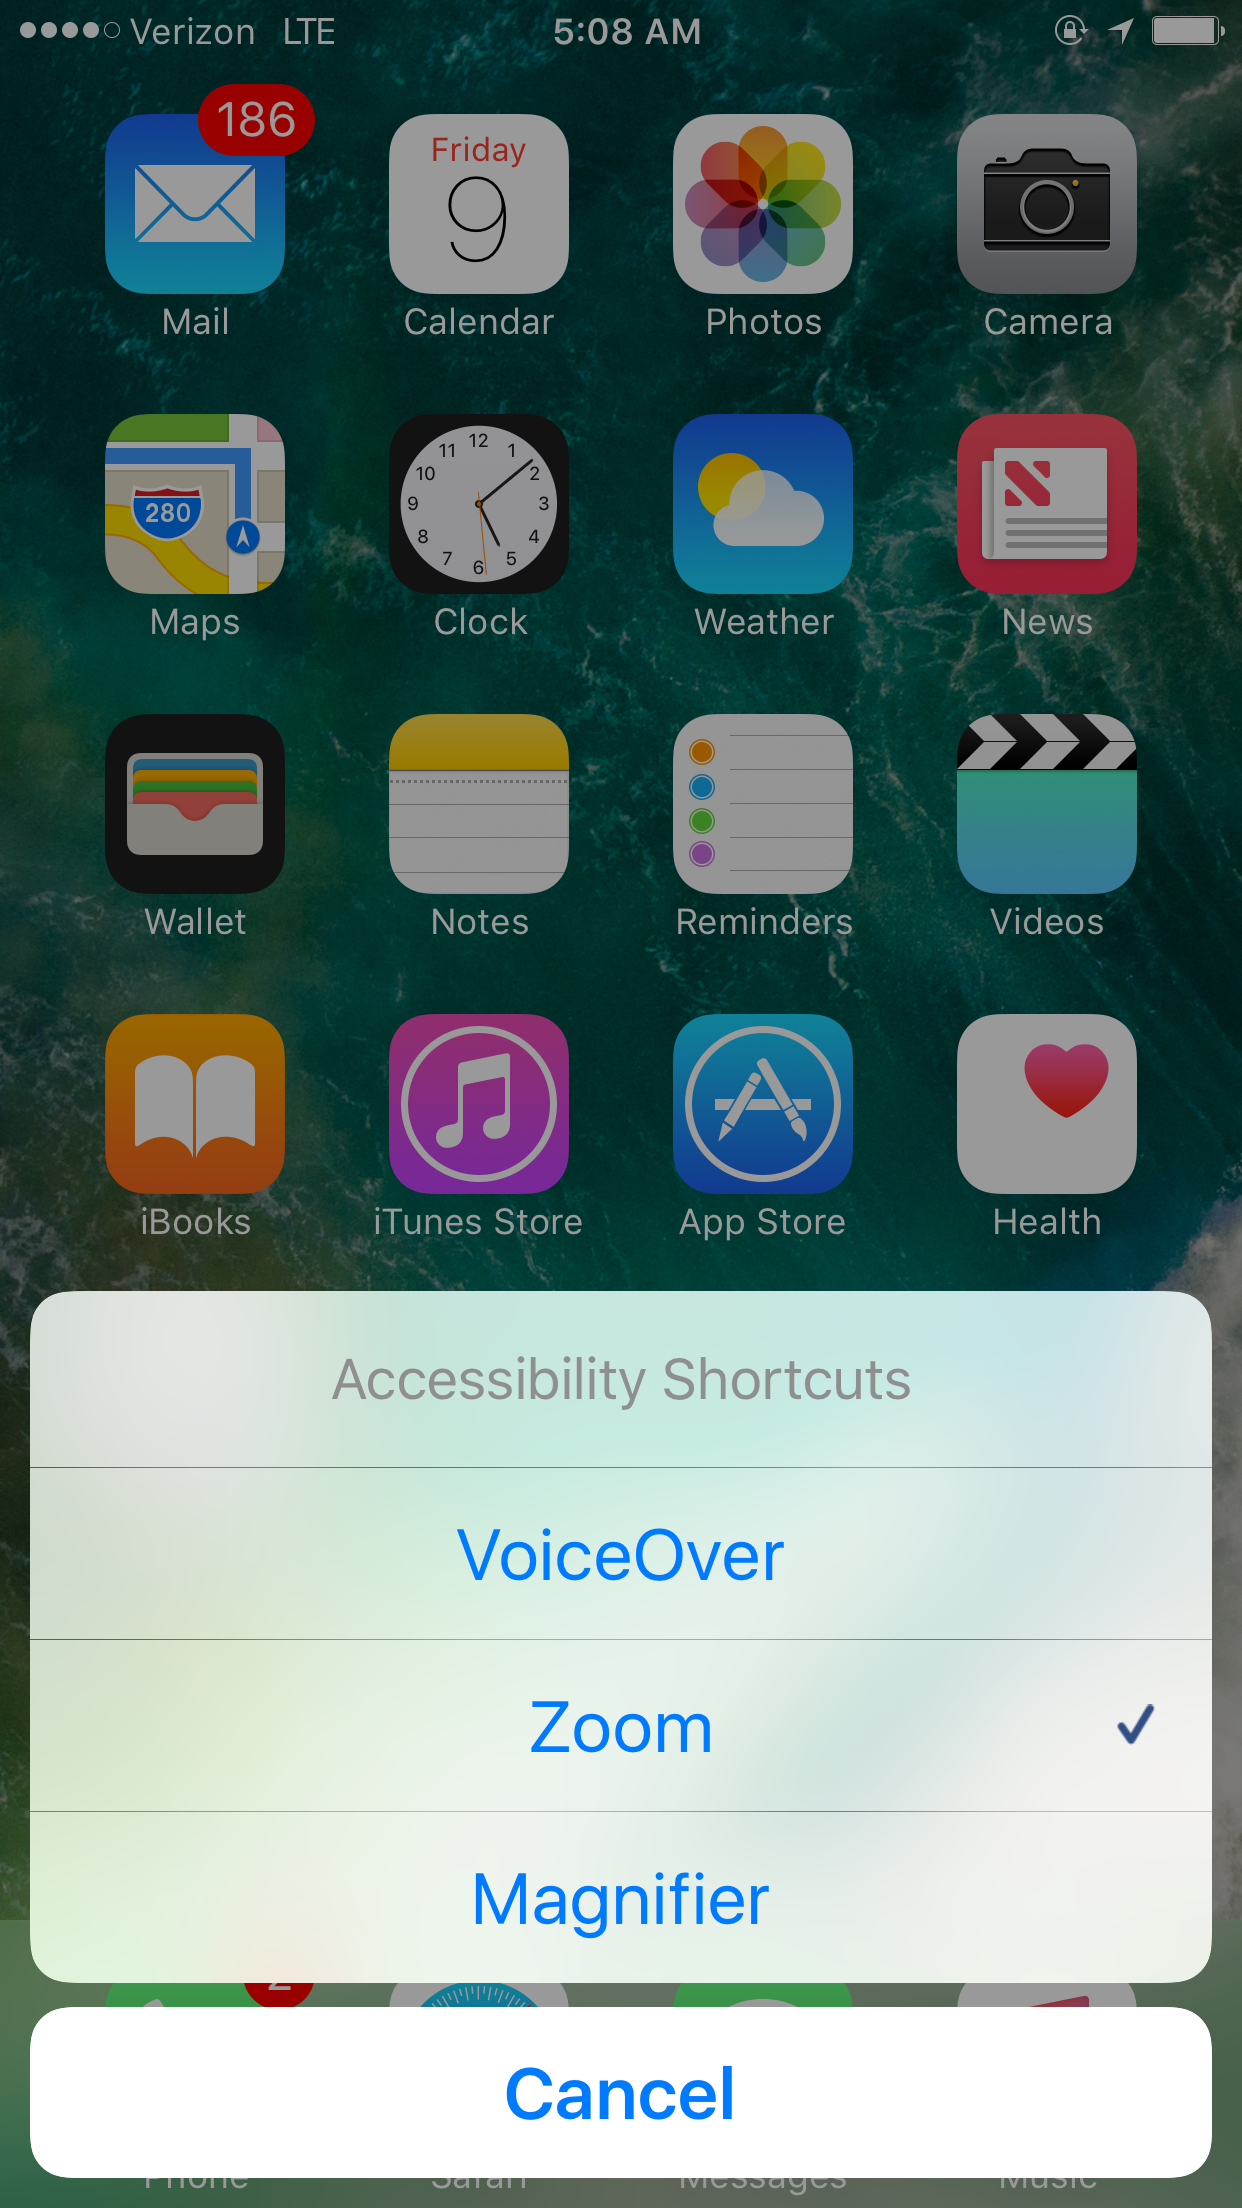
1. Accessibility takes full priority!

Apple consistently prioritizes accessibility. Apple believes technology should be accessible to everyone, and this principle is reflected in their products.

2. It comes in the box.

Tools like VoiceOver and Magnifier make the experience inclusive for all. VoiceOver reads out loud what’s on the screen, while Magnifier uses the device’s camera to magnify small text or objects.

Customization:

You get what you get, but you’ll be happy with it.

Polished in appearance, iOS offers limited customization, primarily to wallpapers and app icon arrangements. While iOS ensures a consistent and sleek user experience, it does restrict deeper system-level customizations.

Features:

1. Exclusivity

With its robust App Store, iOS often gets exclusive apps and early releases. Developers frequently prioritize iOS for new apps, leading to earlier or exclusive releases on the platform.

2. Seemless communication between other iPhones

Integrated features like iMessage and AirDrop create a cohesive user experience. iMessage allows seamless messaging between Apple devices, while AirDrop provides quick and easy file sharing.

Cost:

1. You’ll be paying the Apple tax.

Apple devices come with a higher price tag. Apple’s commitment to quality materials, design, and user experience often means a premium price.

2. Price insures premium quality.

This reflects their consistent quality and premium experience. While more expensive, Apple devices offer a refined, reliable, and cohesive user experience.

Android: The Versatility of Choice

Ease of Use:

1. Major learning curve.

Android’s diverse device range can be a bit challenging for newcomers. With a multitude of manufacturers and interfaces, there can be variability in user experience.

2. Your settings will never stay the same… because you’ll keep playing with them.

With time, it unveils a multitude of functionalities. As users become familiar with Android, they discover a wide range of features and settings to enhance their experience.

Accessibility:

1. Accessibility is included.

Android ensures its accessibility with features such as TalkBack. TalkBack provides spoken feedback for everything users do on their devices, assisting those with visual impairments. The one thing about TalkBack is not all Android devices allow it to be turned on during setup, so it’s not as easy as Apple makes it.

2. Accessibility can be improved through development.

Its open-source nature allows developers to introduce specialized accessibility apps. Developers can create and share apps specifically tailored to assist users with various needs.

Customization:

1. You can make it your own.

Android is a haven for those who love personalizing their devices. Beyond basic customizations, users can change everything from fonts to system behaviors.

2. Too many options!

Everything from widgets to launchers can be customized. Widgets provide at-a-glance information on the home screen, while launchers offer entirely new interface designs.

Features:

1. Unlimited apps, unlimited possibilities.

The Android Play Store is expansive and varied. With millions of apps available, users have a vast selection to suit their needs.

2. A multitasker’s dream.

Unique features like split-screen apps and a flexible file system cater to diverse user needs. Split-screen allows two apps to run side by side, while the file system offers more direct access to stored data.

Cost:

1. For the budget conscious.

Android caters to a wide range of budgets. From entry-level to high-end, there’s an Android device for every price point.

2. Different brands have different prices.

It offers devices from budget-friendly to luxury. Whether you’re looking for a basic phone or a flagship with all the bells and whistles, Android has options.

Navigating the world of operating systems can be complex. Whether you’re attracted to iOS’s integrated elegance or Android’s boundless versatility, the choice is deeply personal. As you weigh your options, consider your priorities and how you envision using your device. The optimal operating system is the one that best complements your digital lifestyle.

Guide: Getting Started with WordPress

WordPress Logo

Building a website can be a difficult task. You have to purchase a domain, look for web hosting, and then decide how you are going to design your website. Thankfully, WordPress helps by making the website development and design process easier. Many webhosts even have software that can install WordPress with just a few keystrokes. iAccessibility’s webhosting program offers this through a software package called Softtaculous. While this is certainly an option, it is also important to know how to install WordPress manually. Here’s how it’s done.

Requirements

To set up WordPress, you will need a domain. You can purchase a domain from several places online, but some popular options include Google Domains, Hover, and Namecheap.

Once you have your domain, you will need web hosting. iAccessibility offers web hosting at $5 per month, but Bluehost, DreamHost and others offer similar pricing plans. We will offer a guide at a future time to discuss setting up and managing a monthly web hosting plan. One thing to consider is that your web hosting provider should have access to a database provider like MySQL. It will also help to have PHPMyAdmin installed in case you need to make database changes. You will also need an easy way to modify databases, which cPanel and other major providers like Plesk can provide.

Along with having these online services, you will need an FTP client. Some of these include FileZilla, WinSCP and File Explorer for Windows. For those of you who use the Mac, you have several options. Transmit for macOS, CyberDuck and FileZilla will all allow you to upload and download files from FTP and sFTP servers.

Setting Up WordPress

WordPress is a complicated web-based software platform that allows web developers to build complex websites with very little effort. To start, head to wordpress.org, and download WordPress to your computer. WordPress will download as a ZIP file, so you must extract the files to a folder on your computer. Extracting WordPress will create a new folder with all relevant files included.

Once you have all the WordPress files, you will need to upload them using your FTP client. This guide does not cover each client, but you will need to upload your files to either a folder called www or public_html. This part may take some time, so take a break and come back when it’s done.

WordPress is now up on your server, but it won’t work until you connect it to a database. This is why you need MySQL. MySQL is a database engine that allows WordPress to store information for fast retrieval. If you have cPanel, you will need to perform the following tasks:

  1. Open MySQL Databases on cPanel.
  2. Create a new database. The database will contain your username followed by an underline and then the database name.
  3. Once you create the database, create a MySQL user and set a password.
  4. The final step here will be to associate that user with your database and give it full access to the database.

Now that our database is set up, it is time to tell WordPress how to connect. Here’s how this works:

  1. On your computer, open the downloaded WordPress folder.
  2. Find the wp-config-sample.php file and open it in a text editor.
  3. Add your database name, username and password that you set in cPanel.
  4. Save the file without the word sample in the name, and upload that file to your WordPress folder using FTP.

This will now let WordPress work correctly.

WordPress Installation

The last part of this process is to run the final WordPress installer. This is as simple as going to your new website address in a browser. Doing this will start the WordPress setup application. WordPress will ask you several questions like what username you would like to use, what email address will be used for the website, your desired time zone, and web address.

WARNING: Please do not use the username of admin at this point. Hackers look for WordPress sites all the time, and they always try to hack sites that use the admin username for administration.

Administration

Once your site is set up, head to yourdomain.com/wp-admin to login and change aspects of your website. The administration screen is where you will go to create posts and change the settings of your site. The first thing you should do here is to find the general settings screen, and make sure all information is correct. This includes your site address, email, time zone, and date formats.

Themes

WordPress is a powerful content management system, but it would be useless without a theme. A theme is a template that provides the design for your website. Out of the box, WordPress is a completely accessible solution, but not all themes hold accessibility in such high regard. You can find accessible themes by looking under the accessible theme category at wordpress.org. One of the nice things about themes provided by WordPress is that they are accessible. If you see a theme with a year name as the name, like twenty-twenty, then you know that the theme came from WordPress and that the theme will be accessible.

Once you select a theme, you will need to set its appearance. To do this, head to your administration screen, select appearance, and then customize to your liking. You can change your site’s look and colors from this area.

Plugins

WordPress has a lot of features built in, but there are a lot of plugins that can be added to extend the functionality of your site. Here are a few suggested plugins to get you started.

  • Akismet – a great security plugin
  • Jetpack – a plugin from WordPress’s parent company Automatic to integrate a WordPress site with wordpress.com
  • BBPress – a great forum system for WordPress sites.
  • Yoast SEO a greatat search engine optimization plugin.
  • WooComerce – a shopping cart plugin for WordPress
  • WordFence – An antivirus plugin

Security

It is very important to secure your website. Akismet for personal use and WordFence are great plugins to keep your site safe. You may also want to consider disabling login support if you are not going to have a community-based website.

Updates

Updating your WordPress website is essential. WordPress will automatically update, but your plugins will not. A good suggestion is to login once a week to your administration screen and make sure your plugins are up to date. Themes need to be updated as well, so make sure that there are no updates available on your site and, if there are, make sure that you install the latest versions to protect your site against plugin and theme exploits.

Conclusion

WordPress is one of the most powerful and accessible content management systems out there. This guide was written to help you install WordPress, but there are so many things you can do that we can’t touch on everything here. Google has an abundance of websites with guides on customizing themes, creating child themes, and even creating your own plugins, so I encourage you to keep learning about this platform so it can be what you need it to be to make your website successful.

What is an Android Launcher?

Nova Launcher

The title says it all. To those who have never used an Android device, or maybe to those who are familiar with their Android device only somewhat, you may be wondering what a launcher is. Let’s see if we can shed some light on this topic.

A launcher on Android is similar to the desktop you use to interact with your desktop or laptop computer. All interaction you have with your Android device is done through the launcher. That is it!

Here is the part that tends to trip people up. Why are there so  many launchers available in the Play store? The answer is: Choice! So why have so many choices? Everyone has a different idea of how they would like to interact with their device. I, for one, find this to be a nice feature of Android in general. The flexibility and choice you have as a user to create your own experience is extremely important to me. You can spend days, weeks, even months customizing your device to be able to interact with it exactly how you want.

That is it! A launcher is the user interface that allows you to interact with your device. It can be customized to do exactly what you want.

In the coming weeks, I will introduce several launchers and include screenshots where I can. I will go through basic setup and customization steps to show how launchers are the same, but different at the same time.

Here are a few of the launchers that will be covered (not in any particular order):

Nova Launcher

Apex Launcher

Google Now Launcher

Go Launcher

ADW Launcher

CM Launcher 3D

If you have any launchers you would like to see demonstrated, please send me an email: dan@iaccessibility.net

You may also follow me on twitter: @dan_droid_hart


Guide: Getting Around iPad Multitasking bug in #iOS11

iPad Pro Front and Back

iOS 11 has changed the way users work with apps by introducing an improved Dock and a new way to work with two apps at once, which lets users stretch and shrink apps to be the size they want. You can also have an app float on top of another app, but these amazing features do not work properly with VoiceOver at this time. Our hope is that, in iOS 11.1, Apple will fix this bug, but until then, there is a work around to still use two apps at once with VoiceOver. Here is how it works.

  1. Find the status bar and swipe up with three fingers to reveal the control center.
  2. Find the app that you are currently using with one finger.
  3. Find the app you would like to use with the first app that one finger is on. This second app will be in the Dock.
  4. Double tap and hold on the new app and then drag the new app to your other finger.
  5. Keep holding your finger on the new app that will be moved on top of the first app until VoiceOver opens the first app and makes a sound.
  6. You can then move the new app to where you want, or move it to the right or left to make the app be to the left or right of the main app. At this point you may lift that finger.

During this process, VoiceOver will not read the status of the drag and drop so you will have to follow this guide specifically if you would like this feature to work. Hopefully Apple will fix this in a future update.

Joining the Windows 10 Insider Preview

A picture of the Windows Logo

Like macOS X, Microsoft offers a Windows beta test program called the Insider Preview program. In a previous episode of the iA Cast we promised a post on how to join this program and here it is.

An important thing to note is that Windows Insider builds are beta versions, and may contain bugs and problems. These builds may even cause your computer to not work properly and I even had to reinstall my graphics card drivers in the latest build to make Magnifier and games work correctly, so installing the Insider Preview will be something you do at your own risk, but they do offer slower upgrade rings so that you get more stable builds which should not have as many problems. For extra stability, a good idea is to set up a restore point on your machine before starting this process

Installing Insider Preview in Windows 10

  1. Join the insider program at the Microsoft’s Windows Insider website
  2. Read the agreement and join the program on the website.
  3. You will need to use your Microsoft account here to join the program.
  4. Back up all important files.
  5. In Windows 10, Open Settings app.
  6. Click updates and Security.
  7. Select Windows Update
  8. Select Advanced Options.
  9. Find the section for Get Insider Builds and select Get Started
  10. Read the disclaimer and go through the prompts.
  11. Restart your computer.
  12. Once your computer restarts, you should go back to the screen for the Insider Preview Builds and select your ring. The ring is for how often you will get Insider builds. the longer the amount of time between builds will allow for the builds to be more stable.

The Insider Preview are as follows;

  • Release Preview – Insider builds for the most stable versions of software and drivers.
  • Slow – Builds that contain minimal risk to applications and services on devices.
  • Fast – Builds that are for those who enjoy being the first to test new software features. These builds can contain bugs and other issues that may effect your system.

By default, all users are signed up for the Release Preview ring but this can be changed at any time. Once you sign up for the Insider program it will take some time for Windows Update to download the Insider build.

Returning to Stable Windows

It is simple to return back to the stable version of Windows 10 if you decide to opt-out of the Insider Preview program

  1. Return to Settings then Updates and Security.
  2. Find Windows Update and select Advanced Options.
  3. There should be an option here that says, “Stop Insider Builds.”
  4. A popup window will appear to turn off insider builds for a certain amount of time.
  5. There will also be an option to stop receiving Insider builds to just stay on the stable version of Windows 10.

If for some reason this process does not work then this would be the time to use the restore point that you created before starting the Insider Preview program.

Conclusion

Microsoft’s Windows Insider Preview program lets users see and test the new features that are coming in future versions of Windows. With the future release of the Windows Creators update, Microsoft has provided testers with an opportunity to shape the future of Windows and improve each update to make the OS more stable and enjoyable.

Guide: Pairing with W1 Enabled Headphones

Side of the PowerBeats 3 with W1 Chip

Apple this year removed the headphone Jack from the iPhone 7 which demanded a change in wireless technologies for bluetooth users. To help in this, Apple created the W1 Chip which currently is on the Beats headphones and will soon be on the Apple AirPods. One advantage is that W1 enabled headphones will pair with all of your Apple devices using iCloud. In this Guide we will look at the ways you can quickly pair these headphones with all of your devices.

Initial Pairing

To pair your W1 enabled device with an iPhone for first time use is simple. Just have the devices on and near your each other. The iPhone will prompt you to unlock the device with touch ID and then tap a button on the screen to pair it with the headphones. I did this process on my iPhone 7 Plus but it will work the same on any other iPhone or iPad.

Connecting to W1 device with iOS

If you have connected to your device from your watch, Mac, or with any other iOS device then you will need to tell your current device to reconnect to the bluetooth device with the W1 chip. Here is how this works.

  1. From your home screen open Settings.
  2. Find Bluetooth on the main settings screen.
  3. Tap on your headset and it should connect.

Connecting with Apple Watch

As we discussed previously, the W1 enabled devices will pair to all of your Apple devices, and this includes the Apple Watch. This is an easy way to connect an audio device that lets an Apple Watch user privately use VoiceOver. Here is how to connect your headset to Apple Watch.

  1. Slide up from the bottom of the screen with one finger, or swipe up with two fingers if you are running VoiceOver. You will need to be at your watch face to do this. If done correctly, you will have brought up Control Center.
  2. Find the AirPlay icon and tap or double tap on it.
  3. When asked, tap or double tap on the name of your headset. This will connect your headset to your watch and all sound from your watch will go through the headset.

Connecting with the Mac

Connecting to a W1 headset on the Mac allows you to use the headset on your Mac for all sound output. Here is how you connect the two.

  1. Find your Menu extras in the top right of the screen or by using VO+M+M
  2. Find the option for Bluetooth and expand the menu.
  3. Find your headset and bring up the sub-menu
  4. Select Connect to connect your headset to your computer.

Conclusion

Apple has really improved the use of Bluetooth technologies with this new W1 chip, which they plan to use in their upcoming AirPods. The addition of the W1 chip allows for users to easily pair and connect to all of their devices without a long process of pairing and impairing devices.

Magnifier for #iOS10

Image showing magnifier in accessibility shortcut menu.

iOS 10 has added several new accessibility features, but one stays out for low vision users. This feature is called Magnifier, and I have enjoyed it since developer beta 1 of iOS 10.
Image showing magnifier in accessibility shortcut menu.image showing magnifier feature which is enlarging  a MacBook Pro screen with WordPress admin screen.

The magnifier feature lets a low vision user enlarge their surroundings with the device’s cameras. You can enable flash, lock focus, and even set traditional magnifier filters that you would expect on a handheld magnifier like yellow on blue, or white on black.

To enable this feature:

  1. Go to the Settings app.
  2. Go to General
  3. Go to Accessibility
  4. Find Magnifier
  5. Use the toggle switch to turn on or off Magnifier

To enable magnifier, simply press the home button 3 times. If you have other accessibility shortcuts set then it will be the last option in the menu.

Magnifier is a great new feature for iOS 10 and I am excited to hear what everyone has to say about it.

Back to Top