Home / Blog / Report

A Brief Introduction to the New Lock Screen in iOS 10

Image showing default iOS 10 Lock Screen

When your phone restarts after updating to iOS 10, you’ll notice the lock screen has some major changes. This post will hopefully give you an understanding of the iOS 10 lock screen, and how to navigate it.

Note: This entry refers to “swiping.” For VoiceOver users, this is a three-finger flick; for those who do not use VoiceOver, it is a one finger swipe in the directions stated.

Firstly, slide to unlock is officially dead. All directions which you could use to get from your lock screen to your home screen are now taken by other features.

If you swipe from left to right, you will find iOS 10’s Widgets. This can contain anything from Weather, Calendar, and Traffic information, to third-party widgets.

Swiping right to left will launch the camera.

Swiping down with one or three fingers respectively, will get you the Notification Center, just like anywhere else in iOS.

Lastly, swiping up from the bottom of the screen will launch Control Center, just like everywhere in iOS.

Although you can disable as many or as few of these sections as you please, you cannot get your Slide to Unlock functionality back.

So, how do you unlock your phone?

By default, you press the home button. Yes, this is even the default behavior for devices with Touch ID.

This method of unlocking an iOS device was implemented because touch ID was too fast for some users, preventing them from reading their notifications on the lock screen.

If you would prefer to unlock your device with Touch ID, instead of having to press the home button, follow these steps:

  1. Open Settings.
  2. Tap General, Accessibility, Home Button.
  3. Enable “Rest Finger to Open.”

The new lock screen in iOS 10 will be something for most people to get used to, but we hope this post helps a little with the transition process.

Improvements to HomeKit in iOS and tvOS

Image showing home kit icon on presentation stage.

If the topic of home automation interests you at all, you’re going to love what iOS 10 and tvOS have to offer. Until now, Apple’s HomeKit platform has been a bit underwhelming, and not exactly user friendly. Finally, Apple has better integrated HomeKit, and made it easier for users to manage all of their HomeKit devices.

Some changes include:

The arrival of the much needed, and anticipated Home app in iOS 10. Now you can easily manage all HomeKit-enabled products in your home, set up groups of products into Rooms, create and manage Scenes, and set-up HomeKit Triggers for a fully automated experience. This is a much improved experience over iOS 8 and iOS 9, where one would need to manage each product with its own app, and integrate them all with another third-party app.

You can now also control HomeKit devices and set scenes right from the third page of Control Center. This is much more user-friendly than launching the app, and is a great alternative for when you’re unable to use Siri.

Speaking of Siri, Siri’s HomeKit support is much improved in iOS 10. In previous versions of iOS, the connection between Siri and HomeKit devices didn’t work about as often as it did work. Now this is no longer the case. Rarely does Siri tell me my devices are not responding, and you even get a bit of humor at times.

In addition, HomeKit is supported on the Apple TV. This means, you can set the movie scene to dim the lights before you watch a movie, all with the 4the Generation Apple TV’s Siri remote. The Apple TV can also function as a HomeKit hub for better performance when you’re away from home.

Note: If you have an iPad which remains at home, on wifi, and plugged in all the time, it too can function as a HomeKit hub.

After testing HomeKit throughout the beta cycle of iOS 10 and tvOS, I am happy to report that all features are 100% accessible. I hope you all enjoy using HomeKit as much as I do!

New VoiceOver Features in iOS 10

Image showing VoiceOver icon. icon is a grey gradient to white with a universal access symbol and a speaker with sound waves going to the right.

iOS 10 has a lot of goodies for everyone, including those of us who are blind or visually impaired. We are excited to introduce you to a few of the major VoiceOver changes in iOS 10, which are sure to improve your experience!

Pronunciation Editor

VoiceOver now has a pronunciation editor! The truth is no screen reader is going to pronounce every single word the way we’d like – this is especially true for names. Finally, iOS gains a pronunciation editor just like the Mac has had for years. You can check out this feature in Settings > General > Accessibility > VoiceOver > Speech > Pronunciations.

Verbosity Panel

Similarly, VoiceOver now has a Verbosity panel. Although it is limited, this section in VoiceOver Settings allows you to adjust the amount of information that is given by VoiceOver. Currently there are options for Speak Hints and Speak Emoji Suffix.

New Audio Settings

Additionally, in iOS 10, VoiceOver Settings now includes an Audio section. In this section, you can find a toggle to Auto Select Speaker in Call. If this feature is enabled, you’ll notice the same behavior you always have when making or receiving a phone call with VoiceOver running. However, if you turn this option off, calls will no longer be affected by the proximity sensor, regardless of whether or not VoiceOver is running. The second option in Settings > General > Accessibility > VoiceOver > Audio will only appear if a stereo audio device is connected. This could include headphones or a bluetooth speaker. With headings called Speech Channel and Sound Channel, this option allows you to control whether VoiceOver speech and sounds come through the left channel (or speaker) or right channel (or speaker).

Voices

Another great addition to the VoiceOver section in Accessibility Settings is the inclusion of more voices. If you don’t like the current options for VoiceOver voices on iOS 10, if you get bored of voices easily, or if you just like using different voices for different tasks, you will be happy with iOS 10. New voices have been added for use with VoiceOver. Feel free to check them all out in Settings > General > Accessibility > VoiceOver > Speech > Voice.

Custom Rotor Actions

Lastly, there is a new feature in iOS 10 that may affect how you use the OS as a whole, and apps that are updated to support it. It is an option for developers called Custom Rotor Actions. This allows users to quickly accomplish tasks using the rotor, instead of searching for buttons or using a pass-through gesture. There are many examples of this, but here are two great examples:

When on the home screen in iOS 10, you will notice VoiceOver tells you the actions are available for each app, and if you swipe down, there is an option for Arrange Apps. If you would like more information about how to arrange apps this way, we have a great post about that here on iAccessibility.

Secondly, you will notice custom rotor actions in the Mail app. When you come across mail threads in your inbox, there will be a new “Expand Thread” option. This allows you to quickly interact with mail threads without having to leave your list of other messages. In addition, if you tap on a message to view it, there will be a Messages rotor action. It will allow you to quickly navigate the thread as a whole, and read all of its messages.

Custom Rotor actions is a wonderful feature, which is sure to improve your iOS 10 experience and productivity.

Welcome Jessica Smith

iAccessibility Logo

iAccessibility is very fortunate to have found such great talent with everyone who has signed up as an author, and this continues with our latest author Jessica Smith. Jessica, is one of the authors of the BlinkieChicks website, and has done work with several online radio stations. Jessica will be writing posts for the iAccessibility report and believes in the mission of iAccessibility. With that said, please welcome Jessica Smith to the iAccessibility author team.

Organizing Apps in iOS 10 With Voiceover

Image showing VoiceOver icon. icon is a grey gradient to white with a universal access symbol and a speaker with sound waves going to the right.

Up until iOS 10, the process for a Voiceover user to move apps and organize them into folders involved some work. One had to use the pass-through gesture-the 1-finger double tap and hold to get into editing mode. Then one had to be careful and drag icons around the screen to be on top of each other to create folders. Now this is all new in iOS 10. The rotor now simplifies the whole process of moving apps around and creating folders.

To Move apps:

  1. Ensure you’re on the home screen.
  2. Voiceover will say something like, “camera actions available.”
  3. Ensuring your rotor is set to actions, do a 1-finger swipe down.
  4. Voiceover will say arrange apps.
  5. Do a 1-finger double tap. Voiceover says arranging apps.
  6. At this point you are in a screen and are in edit mode.
  7. we will take camera as an example, you can swipe down and you will have the following option: Move Camera
  8. Do a 1-finger double tap Voiceover says choose a destination for camera.
  9. Find photos by swiping left and/or right on your home screen.
  10. As you swipe down, you have:
  11. Cancel move of camera
  12. Create new folder with photos and camera
  13. Place camera before photos
  14. Place camera after photos
  15. Activate
  16. To create a folder, do a 1-finger double tap on the create folder option.
  17. A box is displayed allowing one to change the pre-written folder name.
  18. Other options include allowing one to move the order of apps-move camera before or after photos as we used in the above example.


Note: To Move Apps to say the dock or a different page while in editing mode you can use your standard gestures to scroll to a different page. One can also navigate to the dock and move apps in one of four positions within the dock.


When one finishes editing, push the home button to get out of editing mode. Voiceover says “finished editing.”

Magnifier for #iOS10

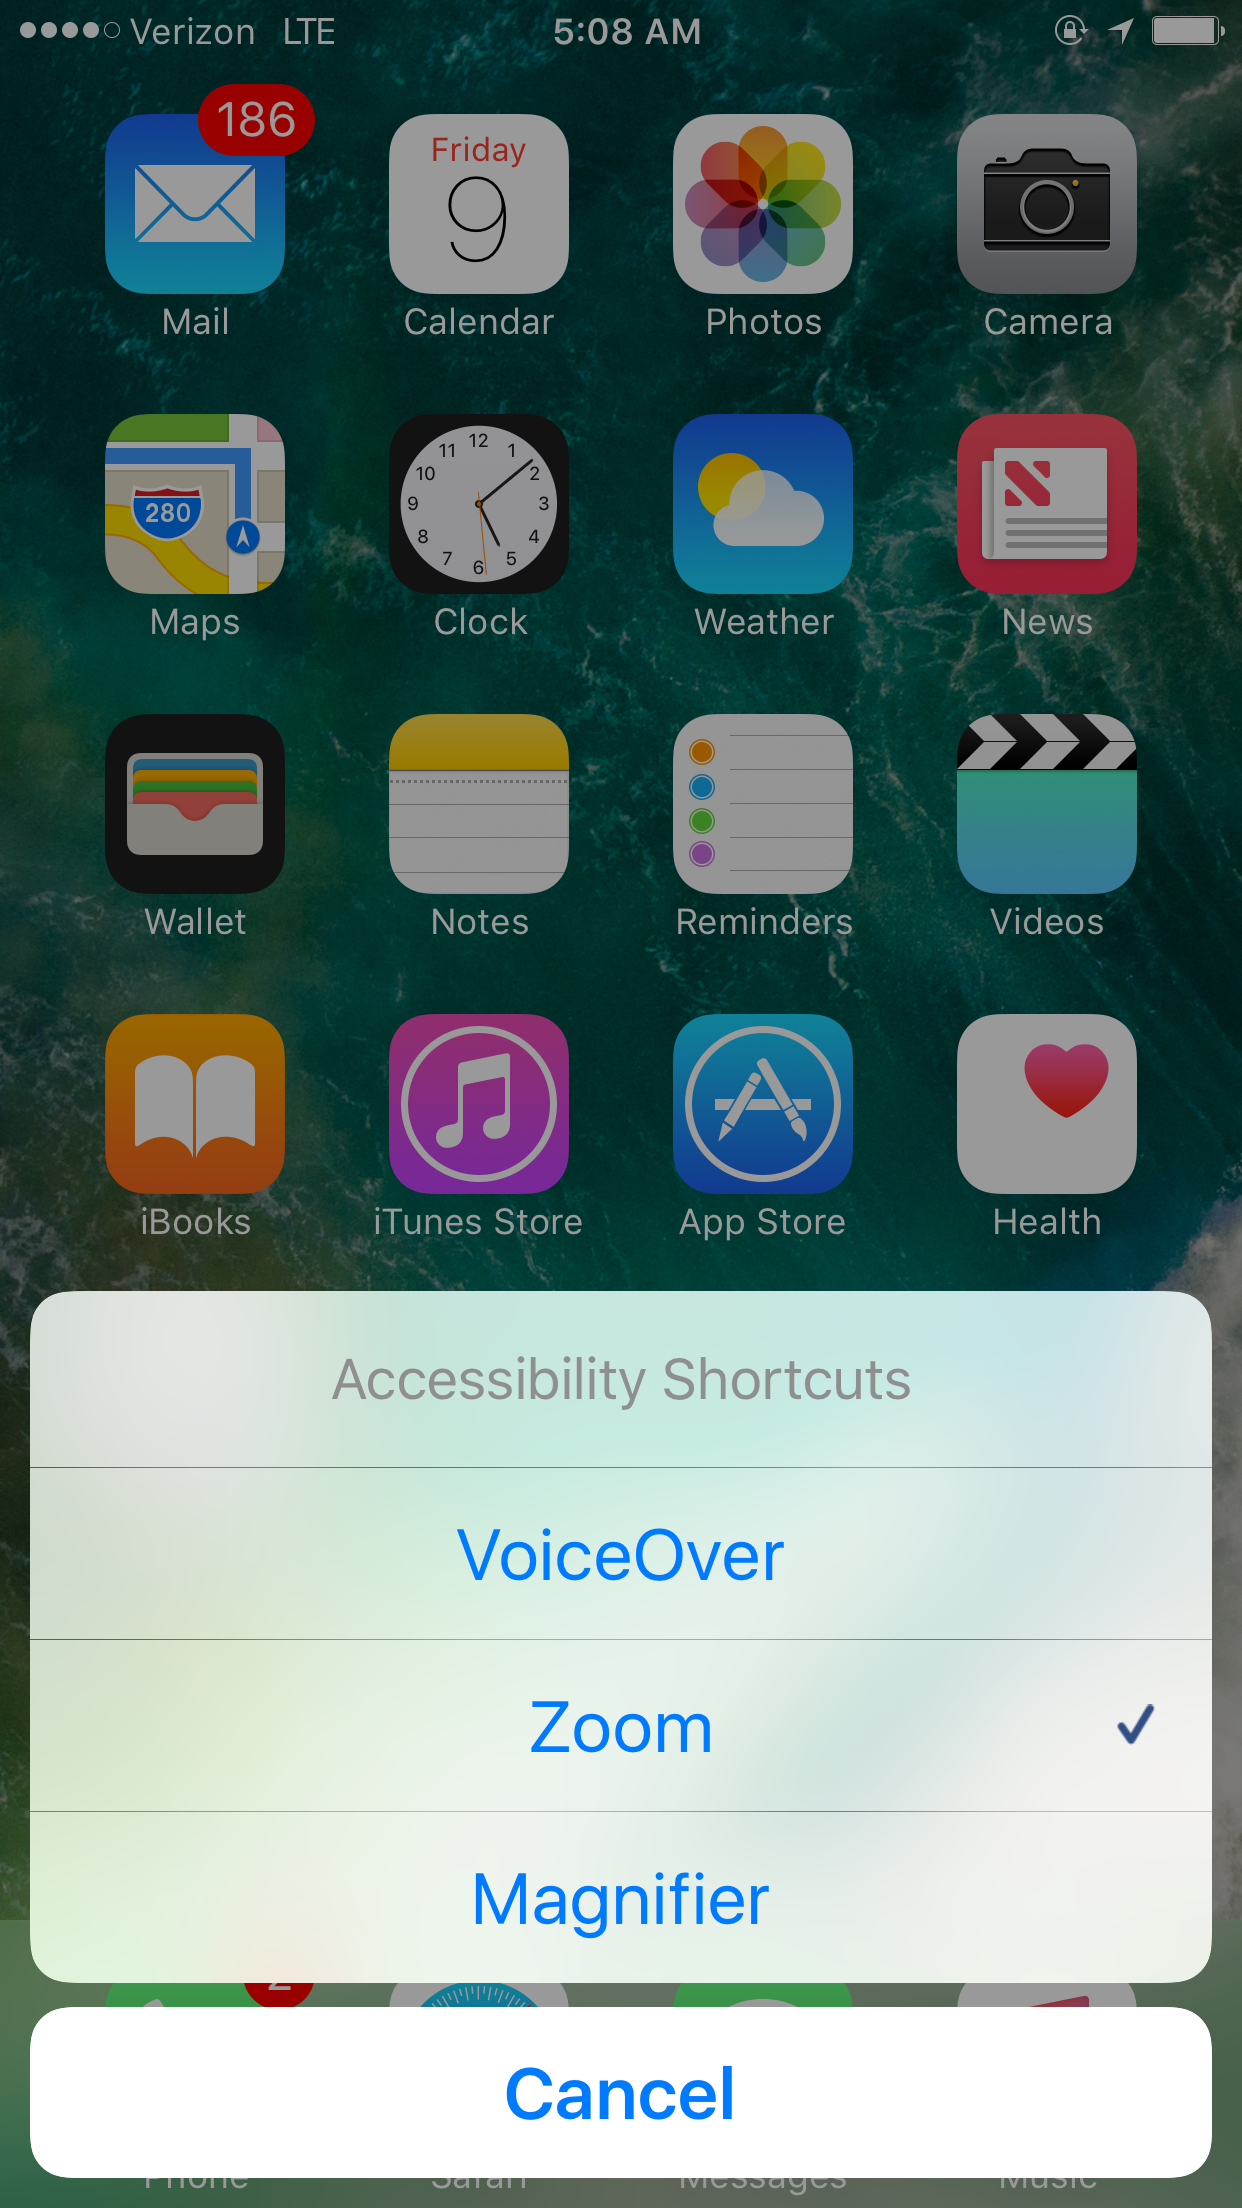
Image showing magnifier in accessibility shortcut menu.

iOS 10 has added several new accessibility features, but one stays out for low vision users. This feature is called Magnifier, and I have enjoyed it since developer beta 1 of iOS 10.
Image showing magnifier in accessibility shortcut menu.image showing magnifier feature which is enlarging  a MacBook Pro screen with WordPress admin screen.

The magnifier feature lets a low vision user enlarge their surroundings with the device’s cameras. You can enable flash, lock focus, and even set traditional magnifier filters that you would expect on a handheld magnifier like yellow on blue, or white on black.

To enable this feature:

  1. Go to the Settings app.
  2. Go to General
  3. Go to Accessibility
  4. Find Magnifier
  5. Use the toggle switch to turn on or off Magnifier

To enable magnifier, simply press the home button 3 times. If you have other accessibility shortcuts set then it will be the last option in the menu.

Magnifier is a great new feature for iOS 10 and I am excited to hear what everyone has to say about it.

Welcome Jason Earls

iAccessibility Logo

We now have a new author on the iAccessibility Report team. Please welcome Jason Earls to the team! Jason comes with extensive knowledge of technology and sound editing and production, so please welcome Jason Earls to the team.

Could VoiceOver Users Catch Them All in Pokemon Go?

Pokemon Go icon

Pokemon Go is the newest craze on both iOS and Android bringing in millions of players to Nintendo’s classic franchise, but could this market be bigger with blind users, and could the game be made accessible for VoiceOver users to play? Surprisingly, the answer is yes to both questions. Here is how.

How Pokemon Go works.

Pokemon Go is a game that utilizes Google Maps and augmented reality to allow for players to catch Pokemon by moving around in the real world. The game overlays a virtual world on top of the map where you stop at Pokestops and find Pokemon that pop up when you get near them. Once you find a Pokemon you tap it and throw a small ball called a Pokeball at it to catch it. Once you level up you can join a team and fight and train in gyms to level up or take the gym for your team.

Could Pokemon Go catch accessibility?

With how this game has been created, accessibility is less of a challenge and more of a time investment. There are already apps like Blindsquare that could be utilized for the maps portion of this game, and 3D audio would allow for the person to move the device where the Pokemon was lined up to throw the poke all at it. You can even turn off augmented reality and it lines up the Pokemon in the center of the screen for you. Much of the game from item to stats is already in text form, so VoiceOver would not have a hard time reading that if coded correctly. Gym battles would be easy to do if the person was told where to tap to attack the enemy Pokemon, and VoiceOver read the battle stats as the battle progressed.

Conclusion

While Pokemon Go is a graphics intensive game, it is entirely possible for it to be adapted to work with VoiceOver on iOS, which is quite a feat compared to most games. I doubt that the creators want to spend the time to work on this, but I think it would be totally awesome to play with some of my totally blind friends.

Go #TeamValor!

Pokemon Go on the App Store

Welcome to Trekz Titanium by Aftershockz

Image of Aftershockz Trekz headphones

The title of this article is essentially what is said when you power on Aftershockz’ newest bluetooth headset the Trekz Titanium. In the past, we have typically blogged about apps and have written about platforms like the Echo, but we really haven’t talked much about headsets until now.

What makes these headphones so special?

All Aftershockz headphones are bone conduction headphones, which means that they sit on your cheekbones to send sound to your inner ear. The headphones vibrate your cheekbone and that sends the audio to your ear. The Trekz Titanium is the smallest and most flexible headset from Aftershockz that will fit most anyone’s head including my big head.

Since your ears are not covered, you can use these headphones to listen to music, audiobooks, or any other audio content while walking outside, ro while doing an activity that requires hearing. This is because of the fact that the headphones do not keep your ears from hearing what they normally hear, and you can still be aware of your surroundings.

Drawbacks

The Trekz Titanium has a 6 hour battery, which does not last long compared to many other headsets. I have not found this to be an issue as they can be charged fully within an hour and a half. Depending on your head and ears, the headset may not be the most comfortable for you, so adjust each side so that it is on your cheekbone instead of your ear. While the audio quality on this headset is good, it is not what you will get from an in ear solution like the LG Tones or the Beats or Bose headphones. I can honestly say that I have heard better and worse on a bluetooth headset.

Conclusion

I have found that the Trekz Titanium was a wonderful purchase that I made at #nfb16 from the folks at A T Guys. The headset can be purchased for $130, which is pretty standard for a bluetooth headset. The Trekz Titanium comes in many different colors, and I totally recommend the blue ones.

All in all this is a worthy headset for users that like to listen to music while moving around their area on foot. It keeps you alert while providing adequate sound quality for what you are listening to.

Aftershockz Trek Bone Conduction Headphones at A T Guys

#NFB16 Resolution 2016-04

National Federation of the Blind Logo

The National Federation of the Blind (NFB) just passed resolution 2016-04 Regarding Apple’s Inadequate Testing of Software Releases.

This resolution specifically targeted Apple’s testing of accessibility of VoiceOver between betas. Many spoke up during this event, and I honestly think that there were more against this resolution than for, but the NFB passed this resolution with a delegate roll call. Here is why iAccessibility does not support this resolution.

Bug tracking

While there have been many bugs with VoiceOver and accessibility throughout the last few years of releases from Apple, there have been many other bugs as well. While the NFB states that these VoiceOver bugs keep people from being employed this is not the case. Typically, bugs that people find are fixed in later versions of the OS, and the truth is that if you took time to fix every bug then you would never put anything out for users to use. Would you effectively make it where users would not be employable altogether.

Since VoiceOver is a small portion of the iOS and Mac operating systems, it should be obvious that not everything can be fixed on initial release of an OS.

 Fairness

While Apple is not the only company to offer built in accessibility in its operating systems, it is currently the most popular. Despite its popularity, the National Federation of the blind should use this opportunity to target other companies like Amazon, Microsoft, and Google for their accessibility testing as they too release software with accessibility challenges.

Conclusion

The National Federation of the Blind has been responsible for many good changes to help blind people live the lives they want, but this resolution is not one of those changes. This resolution put a strain on relations between the NFB and its members with companies like Apple because it is saying how Apple should conduct business. Many of the reported bugs do not hamper productivity or cause an undo burden to users. Many of these bugs may be annoying at best but they are not ones that would cause users to not be able to get work done. I am really interested to see what others think about this resolution. Please put what you think in the comments, or on twitter at @iaccessibility1.

National Federation of the Blind – 2016 Resolutions

Back to Top