Home / Blog / Report

How to access Siri on the Mac

icon showing iOS 10 and macOS icon for Siri

Apple has introduced its latest release of its operating system for the Mac called macOS X 10.12 Sierra. Apple has added its snarky digital assistant to this release of the operating system, and there are some easy ways to access Siri while on the Mac. We will discuss three of these here.

From the Dock

By default, Siri is an icon in your dock, so you can navigate to the dock and activate Siri. This method works, but it takes you out of your task to work with Siri.

From the Menu Extras

By default, Siri will appear in the menu extras area of your Mac. You can navigate to Siri near Notification Center and activate it there. You will still have to leave your current task to use Siri in this way.

Siri from the keyboard

Yes you did read this correctly, you can use Siri for the Mac by pressing a keystroke on the keyboard. A keystroke is where you use multiple keys to accomplish a task. Activating Siri from the keyboard is off by default, so here is how to enable this feature and set a keystroke.

  1. Open System Preferences
  2. Navigate to Siri in System Preferences
  3. Find the option of Keyboard shortcut and select the option you like

Please note that the first option in the list is Command + Space which is used for Spotlight. I personally use Fn (Function) + Space because the function key is also used for dictation.

Conclusion

Using Siri on the Mac with the keyboard is one of the best ways to use Siri. Once you are done with Siri, you are returned to the window you were last using if you press escape to exit the Siri window. I commonly ask Siri questions while playing Minecraft, and this process does not interrupt my gameplay in the slightest.

What I Like About VarioUltra

Image of Vario Ultra 20 cell Braille display on white background.

Are you looking for a Braille display that is lightweight, portable and easy to use? The VarioUltra from BAUM might be what you are looking for. When I think of great Braille displays this one has to be on the top my list. It has many great features, including its own suite of productivity apps.

The display itself:

The VarioUltra is a vary lightweight display. The VarioUltra 20 weighs half a pound and the VarioUltra 40 weighs 1 pound. The keys are shaped in an ergonomic 8-dot keyboard. The keys are curve in such a way so that you can type for hours with no problems. You don’t have to worry about aggravating anyone with the keys because they are very quiet and easy to press.

Let’s talk about the Braille:

The Braille is some of the best I’ve seen. It reminds me of something that has been recently Brailed. I use my VarioUltra on a daily basis and love the way the Braille feels.

Multiple connections:

The VarioUltra was the first Braille display that allows you the connect to five devices at once. You can connect the display to one USB device and four Bluetooth devices at once. What makes it even better is the fact that you can switch between all of your devices with a simple command.

Features:

Here is a brief list of the VarioUltra features:
• Suite of productivity apps, from word processor to PDF reader and more.
• high quality, brushed aluminum construction that looks and feels amazing.
• Crisp refreshable Braille cells that make reading Braille a breeze.

More info:

The VarioUltra 40, with 40 cells costs $3,995.00. While the VarioUltra 20 costs $2,395.00. If you would like to find out more about the VarioUltra, Website.

In closing:

I hope you now understand why I believe the VarioUltra is one of the best displays available. It has many great features including the ability to connect to five different devices, an impressive set of productivity apps, ergonomic keys and much more. I hope you will give the VarioUltra a chance to become your favorite display.

Why Does Bedtime Help with Sleep Schedules?

Image showing the clock icon for iOS. icon is a picture of a clock on back background. Minute Hand is at 2 and hour hand is at 10.

Are you having trouble getting up in the morning? Apple’s new Bedtime feature helps you make sure you go to bed at a time that best suits you. Bedtime lets you set what time you want to go to bed and wake up and the app notifies you when you should go to bed, and the Bedtime specific alerts are a great way to wake up in the morning.

How it works:

The Bedtime feature lets you choose what time you want to get up in the morning and calculates a time that you should go to bed based on information you’ve given it. You can adjust your sleep schedule on a daily basis, or set up a scheduled Bedtime; for example, if you have to wake up at a certain time on week days, you can set it up so that you don’t have to change it unless your schedule changes.

How do I activate Bedtime?

  1. Open the clock app.
  2. Tap on the Bedtime tab in the bottom center of your screen.
  3. Tap on Get Started.
  4. Choose your wake up time and press next.
  5. On the next screen, choose what days of the week you want your alarm to go off, and press next.
  6. Now choose how long you want to sleep and press next.
  7. On this screen, choose when you want to be reminded to go to bed and press next.
  8. Here is where you choose what you want your phone to play to wake you up. Note that these are not your normal alarm sounds.
  9. When you have everything set how you want it, just press save.
  10. You can change your Bedtime and Wake time from the Bedtime tab.
  11. If you need to change your Bedtime settings at any time, press the options button in the top left of your screen.

If you’re looking for something to help you stay on a sleep schedule; the Bedtime feature is for you. Bedtime is an easy to use view website feature that allows you to tell it what time you want to wake up, and it will tell you what time it thinks you should go to bed. Bedtime also sends its data to the Health app so if you want to monitor your sleep pattern, check it out.
If you have questions or experiences with Bedtime that you would like to share, contact us on Twitter @iAccessibility1

Hiding Stock apps in #iOS10

image showing Removable app icon for Weather in iOS

Image showing many of the apps that can be removed that are stock apps.iOS 10 adds the ability to hide certain stock apps from view. This will remove the app from your home screen, but will not delete the app from your phone. Many of these apps are very small, so they should not take up much space on your device. If you do decide to hide an app, then iOS will also remove that app’s hooks from the system, so if you remove FaceTime, Siri can’t place FaceTime calls. You can still place FaceTime calls by selecting that option from your contacts app.

Hiding stock apps in iOS 10

To hide a stock app in iOS 10, simply use the process you would normally use to delete any other app you have purchased from the App Store. There are apps that are not removable, so these will always be on your device’s home screen.

Stock apps that can be hidden

  • Music
  • Mail
  • Calendar
  • Maps
  • Weather
  • Stocks
  • News
  • Notes
  • Reminders
  • Videos
  • iBooks
  • iTunes Store
  • Home
  • FaceTime
  • Calculator
  • Podcasts
  • Watch
  • Compass
  • Tips
  • Contacts
  • Voice Memos
  • Find My Friends

Many of these can be removed to make way for you to use your own solution, an example of this would be to hide the Mail app and use Microsoft Outlook

Restoring Stock Apps

image showing the weather app in the iOS App StoreYou can restore apps back to your device by searching for them in the App Store. The App Store will contain a full app page for each app that is on your device.

Quick Tip: Want to know who’s calling without looking at your phone?

iPhone phone icon showing a white phone handset on a green gradient background.

iOS 10 adds a new feature to the iPhone that lets you know who is calling. When this feature is turned on, iOS will speak the name of the person who is calling. The feature will not read phone numbers at this time, but will read names that are in your contacts list.

Enable Announce Calls

  1. Open the Settings app
  2. Open Phone settings
  3. Find the Announce calls option
  4. Select between Always, Headphones and Car, Headphones Only, or never

This is a great feature if you would like to hear who is calling you. When your phone is muted calls will not be announced. If VoiceOver is on, VoiceOver will read who is calling in most circumstances.

Victor Reader Stream Version 4.7 New Features

Image showing the Victor Reader stream on a white background.

Victor Reader Stream Version 4.7

The very popular HumanWare Victor Reader Stream has as of September 14, 2016 has been updated to include the following features. Below the summary, see descriptions of how they work in detail.

  • Support for subscribing and unsubscribing to NFB Newsline publications directly on the Stream. Note that this feature can only be used in the uS.

Now similar to subscribing to podcasts, you can subscribe to Newsline publications via your Stream’s wifi connection. In the past NFB Newsline users needed to handle the subscriptions using their computer’s internet browser and setting which publications they wanted to read on the stream via a a web interface into the NFB newsline online favorites section of the web site.

For those who didn’t have access to a computer, that proved to be an impossible task.

Today you can search for a news publication you want to always have on your Stream, subscribe to it, and you will always have the daily newspaper to read with just a few key presses.

  • Support for keeping specific NFB Newsline books In addition to handling the subscriptions to Newsline content directly on the Stream, now you can save daily versions of a publication for later use, just by tapping the 3 key.
  • Ability to sync your time with an Internet time server-See below-requires wifi.
  • Ability to remember specific navigation levels on a per book basis
  • Ability To Loop A Folder in Music


Support for subscribing and unsubscribing to NFB Newsline publications


To use this feature perform the following steps:

  1. Ensure you are connected to wifi. Please consult the user documentation if you are unsure on how to do this.
  2. Push the wifi key-the round button above the number 2 to switch to the online bookcase.
  3. Push the 7 key until you get to NFB Newsline. I am assuming you have not set up NFB newsline yet. Push pound when the stream says add NFB newsline service.
  4. Type in your 6 digit identification number.
  5. Push pound. Then, type in your 4 digit security code.
  6. NFB newsline is set up. At first setup, the Stream will go out and syncrinize any publications you already have added in your favorites.


Subscribing To A Publication

To subscribe to a publication, perform the following steps;

  1. On the NFB newsline online bookshelf, push the Go to Key the stream will say, ““Add NFB Newsline Publications”.”
  2. Press the pound key.
  3. You will now be a list of publications.
  4. Arrow up and down to the desired publication.
  5. If you are looking for a specific state in the US, arrow down using 2 and 8 keys until you find the state of interest.
  6. Then, push pound to view a list of that state’s publications.
  7. Push pound to subscribe to the desired publication.


Saving A Publication For offline Viewing

If you wish to save a copy of a publication it is possible to use the copy function by hitting the 3 key when reading the publication to copy it to the Talking Books bookshelf of the SD card. It is not possible to delete publications from the NFB Newsline online bookshelf as the automatic synchronization will remove old editions and add new ones as they become available.


Making An NFB Publication persistent

You can choose to make an NFB publication persistent (the publication will not be removed) by using the “Prevent auto-deletion of an NFB Newsline issue” another option on the 3 key.

Unsubscribing From A Publication


To unsubscribe from a publication:

  1. Find the publication by using the 4 and 6 keys to navigate.
  2. At the top level, you will move from publication to publication. 3. Use the “Unsubscribe from an NFB publication” option” which you can get to by hitting your number

3 key. Note that this will remove all books for this publication from internal memory, including books that were marked as persistent.


Music Changes

When playing Music you can press the 9 key to toggle between the following playback modes:

Shuffle Off

Shuffle On

Loop Folder

Loop Single

Shuffle On will randomize your music, while Loop folder will automatically start playback from the beginning of the current folder when the end of the folder is reached. Loop Single will automatically start playback from the beginning of the current file when the end of the file is reached.


Syncing To A time Server

After you update and connect to your Wi-Fi, first set your time to the current time in your time zone. After this initial setting is done, your Stream will always keep its time, as it is constantly validating its time with a network time server.


Ability to remember specific navigation levels on a per book basis

To enable this feature:

  1. From the offline bookshelves reached by tapping the wifi button above the 2 key, push the 7 key to enter the Stream’s menus.
  2. Push 8 until you hear “save last used navigation level for each book.”
  3. By default it’s off.
  4. If you turn it on and if you have daisy books with multiple levels, and you always navigate to say level 2 headings, the stream will remember the specific different daisy navigation level on a per book basis.

Enjoy version 4.7!!


A Guide to iMessage in iOS 10

Image shows the balloons full screen iMessage effect, with "Happy birthday" written as the text.

Apple crammed loads of new features into iMessage in iOS 10, which add a lot of additional functionality, making the app more fun and social. However, learning what all the new features are and how they work may be difficult for some users. We hope this post will help you understand the new features, and have you using them (or avoiding them) like a pro within minutes.

Look and Feel

First of all, the look of iMessage is a little bit different. You now have photos of contacts at the top of each conversation thread. This is true for individual iMessage conversations, and for groups. The back button is still at the top, and the “more info” button is at the top right. At the bottom of the screen, the “Send” button and text field have been made smaller to make room for three buttons. Note: Although the send button still functions as it always has, it is smaller in size, and it is now an up arrow instead of the word send. This means it is a bit harder to find for VoiceOver users, and may confuse some low vision users. The three buttons to the left of the text field are: “Attach Media, Digital Touch, and Messaging apps.

More Info Screen

The “more info” button, which replaces iOS 9’s “details” button will take you to a screen that is similar in some ways, but there are some things to note. On this screen, you can now toggle read receipts for individual conversations, and you can sort attachments if you are looking for a particular image or link. As always, this is also where you can see the location of people in a group or conversation, contact a person you are talking to, add someone to your contacts, add a contact to the conversation, and rename the conversation. To return to the iMessage conversation, simply tap “Done” in the top right-hand corner.

Media Attachments

Attaching photos and videos is now done with the “attach media” button at the bottom of any iMessage thread. Tapping on this button will bring you to a screen containing your photos and videos, and allow you to take a new photo or video. Once you have chosen an image or video, you can add effects, draw, and more.

Digital Touch

The second button is a “Digital Touch” button. Here you can send a heart beat, or a quick doodle to a friend. It does seem accessible if you would like to try it out. Additionally, if you would like to handwrite a message, to make it more personal, you can do so by switching to landscape in your iMessage thread. Note for VoiceOver users: there are some text snippets available, which you can easily add to any conversation.

iMessage Apps

The third button to the left of the text field is “Messaging apps..” We will have more about this section in the future, but here you will find anything from stickers, to games, to collaboration tools, and much more. Some interesting examples of iMessage apps include an app that allows you to collaborate on a food order with friends, and an app that allows you to quickly and securely send money. It will be very exciting to see what developers do with iMessage apps in the future.

Reactions

Most of the time, you will want to quickly send a message to someone, and that still works as it always has. In fact, if you are really in a hurry, but want to let someone know you received their message, you can do so with iMessage reactions. Simply tap and hold on a message, and you will be given the option to Love, Like, Dislike, Laugh, emphasize, or Question it. This is also where you can copy a message, or tap more to forward or delete it. If you are using VoiceOver, rotate to “Actions” in the rotor and flick down to “react.” Double tap, and you will be presented with the same screen described above.

Emoji Substitutions

Once you’ve entered text in the iMessage field, you can easily replace words with emoji, and there are even emoji in the text predictions bar above the keyboard. To replace words with emoji after you’ve entered text, tap on the “Next Keyboard” button until you find the emoji keyboard. Now, any words that can be replaced with emoji will be highlighted. If you tap on a word, you will then have options to choose from. For VoiceOver users, tap on the text field. VoiceOver should say “Emoji substitutions available.” Rotate to “Emoji” in the rotor, and flick down until you find the word you want to replace. Double tap, and you will be presented with the options available for emoji replacement. If there is only one emoji suggested, it will automatically be inserted for you when you tap on a word..
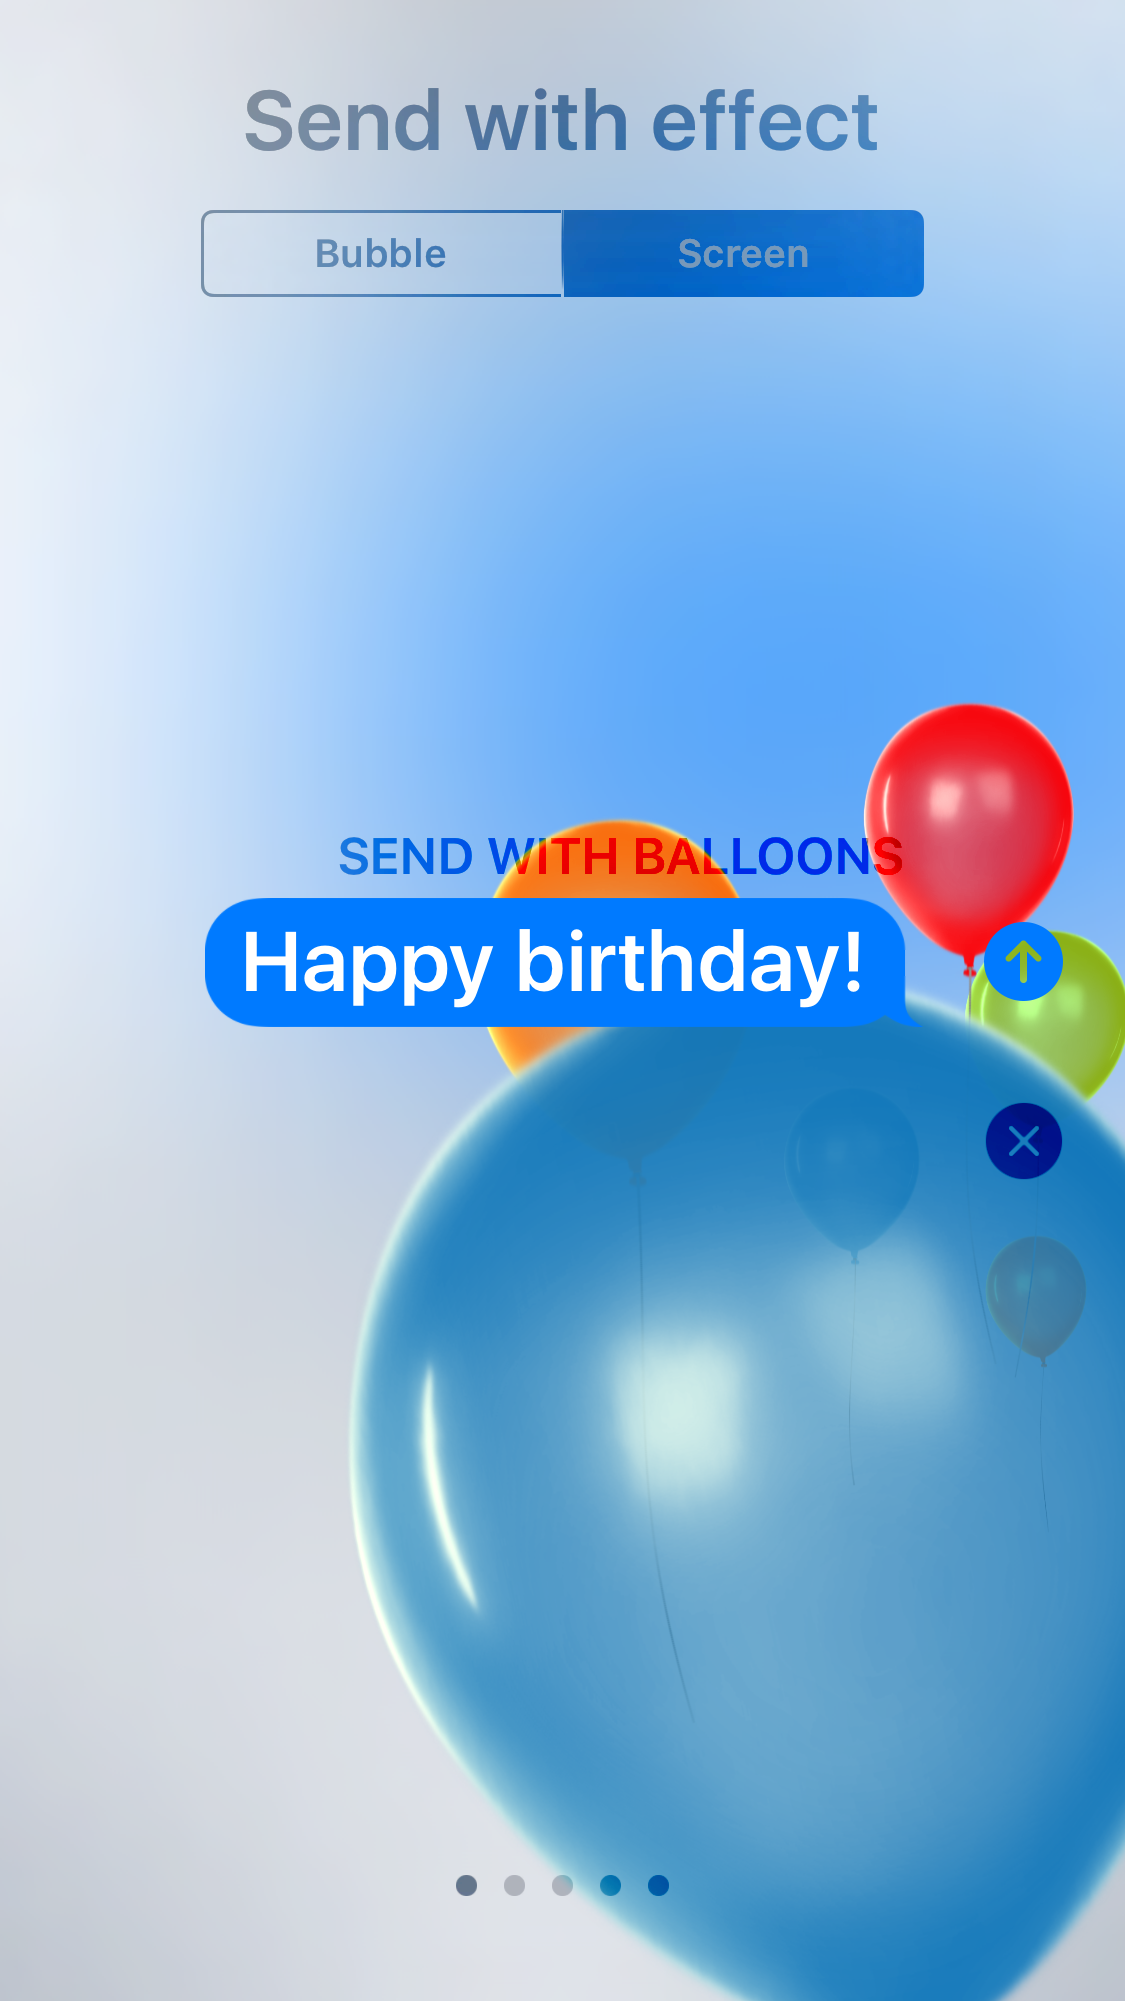
iMessage Effects

Lastly, you can send any message with an effect. This includes “bubble effects” that change how the message itself appears, and “screen effects” that include full screen animations.

Accessibility Notes about iMessage Effects:

Reduce Motion

  • If you have “Reduce Motion” turned on in accessibility settings, you cannot use iMessage Effects.
  • If you are motion sensitive, please DO NOT disable Reduce Motion.
  • To those who use Reduce Motion to make their devices faster or improve battery life, these are myths. Go ahead and turn it off.

Reading Messages sent with Invisible Ink

  • VoiceOver users who have hints disabled may have difficulty reading messages sent to them with “Invisible Ink.” To uncover a message sent with invisible ink using VoiceOver, double tap on the message and scrub, as if you are wiping the ink away.

To Use Bubble Effects:

  1. Type your message.
  2. 3D Touch or tap and hold (double tap and hold for VoiceOver users) on the send button.
  3. Select “Bubble” at the top of this screen.
  4. On the right-hand side, choose the button next to the effect you wish to use. The options are: Invisible Ink, Gentle, Loud, or Slam. You can also cancel the effect if you change your mind.
  5. Tap the send button next to the effect you chose.

To use full screen effects:

  1. Type your message.
  2. 3D touch or tap and hold (double tap and hold for VoiceOver users) on the send button.
  3. Choose “Screen at the top of this screen.
  4. Swipe from right to left (three-finger flick for VoiceOver users) to choose the effect you want. You can choose between Balloons, Confetti, Lasers, Fireworks, or Shooting Star.
  5. Tap the send button next to your message, or the close button if you change your mind.

…and that’s it! That’s how you use iMessage in iOS 10! We know it is a lot to take in, so feel free to refer to this post whenever you need to, or reach out to us on twitter @iAccessibility1 for assistance. Please share this post to help others. Thank you!

These Mail Changes in iOS 10 will Make You Happy

Image showing iOS Mail app icon Mail icon is a white envelope with a blue background.

If, like me, you receive a good deal of email on a daily basis, you may have noticed that there are a few new changes to how you can interact with your messages.

Let’s talk about threads

When I noticed the changes to threading in Mail, I thought I would not like it;. however, now that I’ve adjusted, it makes my life easier. My hope is that this post will give you a better understanding of Mail in iOS 10, and help ease the transition process.


Managing threads in iOS 10 is much easier for VoiceOver users, thanks to the new Custom Rotor Actions feature. There are two ways of handling threads. The first is to tap on the thread to open it. Turn your rotor to messages and start swiping up and down through your thread. You will see the person’s mane and their message. You can interact with that message or the thread with the buttons on the bottom of the screen.
If you prefer the way Mail was handled in iOS 9, find a thread in your inbox, turn your rotor to actions and swipe up to expand thread and once you press that, the thread will expand so that you see each message in a list and you can read them by opening each message individually.

What are filters anyway?

There were times when I’ve wanted to look for a specific message and not known what the subject was, but I knew that it had an attachment that I needed for some reason or another, so I’ve had to go through every one of my emails to find the one I want. I don’t have to do that anymore thanks to filters.

If you want to look for a specific type of email in your inbox, you can use filters. If you choose a filter, your mail app will show you every think that falls in the filter you chose. The filters are, unread, flagged, emails to you, emails that CC’d me, only emails with attachments and mail only from VIP’s.

If you want to filter out mail, open a mailbox, and look in the bottom left corner of your screen. There is a button that says, “filter messages”. When you tap on this button, to the right a button will appear that shows you what filters are automatically applied. Once you tap on this button, all of the filters you can choose from are on the screen. Once you choose the one you want, tap the done button in the top right of your screen.

Once you are done with that filter, look in the bottom left for the filter button and tap it. Once you do that, you will go back to your original mailbox.

Conclusion:

I hope you all take advantage of all the great new features in mail and iOS 10 and don’t forget the ones that were there before. Be sure to check out our other articles related to iOS 10 at at iAccessibility.

A Little Less Type, and a lot More Talking

icon showing iOS 10 and macOS icon for Siri

Want to know the time? Just ask.
Want to know the weather? Just ask.

Now you can harness the power of Apple’s digital assistant, no matter what you’re working on!
From your iPad to your iPod, from your iPhone to your iMac, and everything in between, Siri will always be there, reminding you to bake those cupcakes for auntie Mabel’s birthday, and to always mind your p’s and q’s.

While the mac version of Siri might not be able to control your HomeKit devices, here are some things it can do:
• Control the playback of music in iTunes
• Adjust the system volume
• Toggle on and off accessibility features
• Help you search for files with Spotlight
• Perform web searches in Safari
• Toggle features such as Wi-fi, Bluetooth, and do not disturb
• Give you information about the hardware of your mac, including CPU type and speed, battery level, as well as the amount of storage available
• Place calls with FaceTime
• Send messages and emails
• And so much more…

Notes for VoiceOver Users

Weather: Due to the number of cells in the table and the fact that VoiceOver does not report column headers, the “Details” table can be a bit confusing to navigate.

Notes

iTunes: If you are listening to a song in iTunes and you ask Siri what you are listening to, you will have to read the result with VoiceOver, as Siri won’t speak it, like you might expect from using iOS.
Siri will shuffle songs from artist you request, except for Ellie Goulding. I promise, this is not a joke.
Update: You must preface the request to shuffle Ellie Goulding with the word artist. Example: You might ask something like “shuffle artist Ellie Goulding.”
Mail and Messages: Siri will not read the contents of the messages you dictated as you might expect from using iOS.
Siri will not prompt you for the phone number or email address for the recipient of your message.
FaceTime: Siri will not announce “Making a FaceTime/FaceTime audio call with contact” before the call is placed, like one would expect from using iOS.

P.S. – You are not able to use the Siri voices with VoiceOver in macOS.
The higher pitched tone that is played before Siri answers your request is not allways played in macOS.

Conclusion

Although Siri is not perfect and needs some work, I still think it is a welcome addition to macOS, and I’m excited to see what Apple will do with Siri in the future.

iOS Bug Tracker

picture of Apple feedback assistant icon.

This post will be updated often with new bugs found by iAccessibility authors and by our readers, so please check back often. We will also mark a bug fixed when has been fixed or resolved by Apple.

Zoom Scrolling issue

This bug occurs in iOS 10 for iPhone and iPad when Zoom is enabled. It doesn’t matter if you are zoomed in or not, but when scrolling on the home screen or in scroll views, the system will think you are trying to touch an item and will not scroll. You must stop interacting with the device and try again several times to get the desired result. This has persisted in all betas of iOS 10.

Unlock your Mac with your Apple Watch

Image with dark background with Apple Watch app icon with label in the center.

One of the neatest features added to WatchOS 3 and MacOS Sierra is the ability to unlock your Mac with your watch. Apple uses several new technologies to do this that use high encryption, and data speed measurements to determine if it is ok to unlock your Mac. The cool thing about this is that it is easy to set up. Here’s how you do it.

Prerequisites

  1. Your Mac must at least be a 2013 model Mac for this feature to work.
  2. You must first set up two-factor authentication with your iCloud account. If you haven’t done so, the Mac will walk you through this process.
  3. You must make sure you are not using your iCloud password to log into your Mac. This will require you to set a different login password for your user account than what is used for your iCloud account.

Setting up Unlock from Apple Watch

  1. Open System Preferences on the Mac
  2. Find Security and Privacy
  3. Find the check box that says, “Allow your Apple Watch to unlock this Mac”
  4. Follow any instructions given to enable two factor authentication or to set a non-iCloud Password

Screen shot showing how to unlock the computer with Apple Watch

That’s it! Now, when you go to unlock your Mac, you should just have to wait for your watch to unlock the computer. If for some reason the process does not work, or both devices can’t find each other, you will still need to type your password.

The iOS 10 Feature No One is Talking About

Image showing iOS contacts app icon

Have you ever longed for better control over your Do Not Disturb settings on your iOS device? Have you ever missed an important phone call or text message because your phone was on Do Not Disturb and/or Silent? If you answered “yes” to either of the questions above, then iOS 10 has a feature you will love!

It’s called Emergency Bypass, and you will not find it in your Do Not Disturb settings. Instead, it is done on a contact by contact basis. You can choose to set Emergency Bypass for when a contact calls, messages, or both. If this option is set, your phone will alert you even if it is on silent or Do Not Disturb. Yes, it will play sound and vibrate, while all other calls and messages are silenced.

To set up emergency bypass:

  1. Navigate to the contacts app, or the contacts tab in the Phone app, and locate a contact for whom this feature is needed.
  2. Tap on the contacts name and tap edit at the top right of the screen.
  3. Locate the Ringtone and/or Text Tone field, and tap on it as if to change the tone.
  4. The first option on this screen will be “Emergency Bypass.” Tap the switch to enable this option.
  5. Tap Done at the top right of the screen.
  6. Now on this screen, you should notice, the option you chose to enable Emergency Bypass for should now say “Emergency Bypass on.” For example: Ringtone: Emergency Bypass On or Text Tone: Emergency Bypass On.
  7. Tap done at the top right of this screen.
  8. Repeat the steps above for any additional contacts you wish to add.

It’s surprising that this feature has not been covered by the media, but we sincerely hope this feature means you never miss another urgent phone call or message due to Do Not Disturb. Enjoy, and please share this post to let others know about this important feature!

Back to Top