Home / Blog / Report

Is the BrailleNote Touch the Notetaker of the Future?

BrailleNote Touch with Google on the screen.

The English Braille code allows for people to read and communicate at the same speed as someone who reads and writes in print. Braille Notetakers allow Braille literate users to complete tasks with speech and Braille. Humanware, a company that makes a few of these Braille notetakers has released a new product called the BrailleNote Touch, which is the latest model of notetaker in their line. I have had the chance to work with one of these notetakers, and here is what I have found. By the end of this review, you can decide if this device is right for your situation, or if you should look elsewhere for Braille support with technology.

What is the BrailleNote Touch

The BrailleNote Touch is a Braille notetaker made by Humanware. It allows the user to write documents, store contacts, read emails and much more.

Device Details

Software

Unlike the previous versions of the Notetaker, the BrailleNote Touch runs Android version 4.4 Kitkat, with the full suite of Google apps to allow for Google Play support. This allows for the use of the Google Play store to install apps third party Android apps. Humanware built their suite of apps known as KeySoft on top of the Android operating system to allow for the use of their proprietary apps like KeyWord, KeyMail, and KeyList. KeySoft also offers a new input method called TouchBraille that allows for users to touch the screen with their fingers to type in text fields and other areas. These finger combinations are in the format of Braille characters, and the user can quickly enter text with this method.

Hardware

The BrailleNote Touch appears to look like other Braille Notetakers, but it has several differences. The BrailleNote Touch has three new physical buttons on the front to make the device comply with Google Android Standards. These buttons are Back, Home, and Recent Apps. While these buttons are different, you will also find familiar buttons, like the previous and next thumb buttons, and the buttons used to scroll the Braille display to the right and to the left. On the left side, you will find the Lock button and the volume up and down buttons. There is also a Micro USB charge port on that side as well. On the right, you will find the headphone jack to plug in headphones or speakers. If you are new to the BrailleNote Touch, you will notice that the device has a lip on the left side that is part of the Braille keyboard. If you lift this you will find a touch screen, where you can use TouchBraille to enter text. This screen belongs to the same technologies that Android manufacturers use to make tablets. This is because the BrailleNote Touch is essentially a tablet with a Braille display attached. You can remove the actual BrailleNote Touch from its case by holding both switches at the bottom of the device and by lifting the device out of the case. This process can also be done on the device to remove the battery.

Using the BrailleNote Touch

As mentioned earlier, the BrailleNote Touch uses Humanware’s proprietary software Keysoft which is built on top of Android 4.4. When you boot the BrailleNote Touch for the first time, you will see setup/tutorial. You will be asked to set items like the time and date, the WI-FI, Braille translation tables and much more. Simply use the previous and next thumb buttons to move between items, and you can select by using dot 8 (Enter), or a cursor routing key.

Once you get to the Main Menu, you can navigate with first letter navigation, or by using the previous and next buttons. Once you find the option you would like you can press a cursor routing button, or use the enter key. If the app you are looking for is not listed then you will need to find the all applications option and select it. All previously mentioned navigation commands work in this menu as well. I have found that you can quickly move through KeySoft Menus, but you can quickly get ahead of the speech if you are a fast user, so it may be a good idea to speed up the speech on the BrailleNote Touch as it requires the current item that is being read to finish before it can move on to the next.

A common task that someone might do with this device is word processing with KeyWord. You can find this in the main menu of KeySoft. In KeyWord, you will find commands like Create and Open. One difference in this device is that you save your documents before you give them a name, so once you create your document, you will need to type out what you would like and then save the document. I personally think that each task in creating opening and saving documents has a lot of steps but they do seem to be very similar to these programs in previous versions of the notetaker.

Using Email with KeyMail

Email is a huge part of a person’s daily life, and the BrailleNote Touch allows for several different account types for email, and you are even able to set up multiple email accounts on the same device. Once you have your email set up, you can find options for new message, read messages and more in the KeyMail menu. You will also see an option for Change Account here if you have multiple email accounts. It is very important that you know which email account you are set to so you don’t send email from another user’s account. While the setup process for email is easy, there can be other problems that can arise. While I was using the device, I attempted to set up two email accounts using Exchange. I determined that I needed to update the security on the device, but the machine would crash KeyMail when I would try to change between accounts. Once I had the machine encrypted, which took two attempts and a system wipe, I was able to change between email addresses seamlessly.

Changing settings on the BrailleNote Touch is just as easy as changing settings on an Android device. This is because the settings for the BrailleNote are basically the Android Settings app. If you need assistance making changes to your settings that you do not understand, you can turn accessibility off by pressing the Home button three times and that will exit KeySoft. At this point, you can lift the keyboard cover, and the other person with you can use the device as if it was any Android Tablet. Once they are done, you can simply press the Home button 3 times, and it will activate KeySoft again. I personally found that this makes changing settings easy as they are all in a central place on the device.

TouchBraille

TouchBraille is a new and revolutionary Braille typing feature that comes on the BrailleNote Touch. While in a document or text field, you can type Braille as if you were using a Braille keyboard. To calibrate TouchBraille, place all 10 fingers on the screen at the same time. It helps if you put them in the pattern of entering Braille. A good guide to use is to line your fingers up with the Braille Keyboard that is included, and then just move your hands to the screen. If done correctly, the BrailleNote Touch will make a quick vibration to let you know it is calibrated. If the process did not work, then it will make a longer vibration. Once calibrated, you can quickly type on the screen using your fingers. I have found that TouchBraille is very fast and allows for quick input if and only if you are good at using your fingers with a touch screen. This ode requires that you be able to press Braille symbols with both hands, which means some fingers will be up and some will be down on the screen, so good finger dexterity is required.

KeySOft Version 2

KeySoft, the main software system for the BrailleNote Touch has just been updated to version 2.0 with all new features. You can now use KNFB Reader to read printed documents and these documents can also be saved as plain text for editing at a later time. You will also see a new option for Braille Terminal, which lets you use your BrailleNote Touch as a Braille display for a Mac, PC or SmartPhone.

Conclusion

While the BrailleNote Touch does add many new features to the successful line of BrailleNote devices from Humanware, it does have its own limitations. There is a noticeable speed problem when entering edit fields and when navigating menus. This mainly effects fast users, but beginners will not notice this issue for the most part. The BrailleNote Touch is really a good device for those who are in school, or for those who are used to using Braille as their primary method for taking notes and for communication. If you are familiar with a PC or if you use a smartphone effectively, then this item will only slow you down as completing simple tasks do take longer with more prompts that must be read before you can move on to the next item if you are using speech. Braille does appear to work a bit faster, but you will still notice speed issues with this version of the BrailleNote Touch. Another item to consider when deciding to get a new device is the price. The cheapest BrailleNote Touch starts at $3,995 for the 18 cell display model, and $5,495 for the 32 cell, so purchasing one of these devices is quite an investment.

Product Review: Apple AirPods

Apple AirPods in charging case

When preorders went live for Apple’s iPhone 7 and 7 Plus, I acted fast! I knew I wouldn’t miss the headphone jack, because removing it would pave the way for more advancements in technology. With this in mind, it is no surprise that I was also among the first to order Apple’s new AirPods! I received them on Monday, December 19 – 2 days before the original estimate! I excitedly unboxed them, and paired them. Now that I have had some time to test functionality, here is my impressions and review.

What’s in the box?

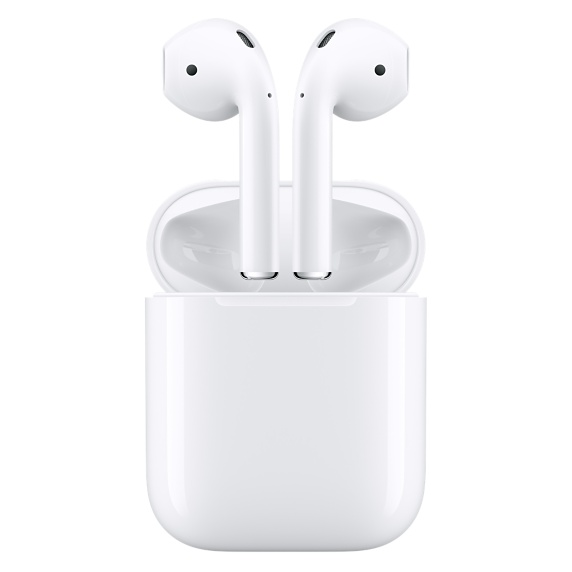
  • The AirPods in their Charging Case
  • Documentation
  • Lightning Cable

Note: The box is shrink wrapped, unlike some newer products from Apple. Also, the box has a tactile image of the AirPods, which is something I always enjoy.

Setup

As many other reviews point out, pairing the AirPods with an iPhone or iPad is quick, painless, and somewhat magical. Simply open the lid of the case while it’s near your device, and an interface similar to Control Center will appear, asking you to connect. Once paired, you can see the battery level of the case and the AirPods themselves. Now, not only are your AirPods paired with the device you’re using, but they are also paired with all other devices connected to your iCloud account. The only omission, at least for now, is the Apple TV. The reasoning for this is that the Apple TV is generally a shared device, so the AirPods must be paired like traditional bluetooth devices. Hopefully this will change soon!

Pairing with traditional bluetooth devices is made possible with a pairing button located on the back of the AirPods case. This button also allows you to reset the AirPods, if you need to start the pairing process over like I did.

Wait, it wasn’t a seamless experience?

Well, it would have been, had I not been on a phone call at the time of initial pairing. Sound quality seemed strange to me, and I could not get the AirPods to show up on other devices. Initially, I went to Settings > Bluetooth, and forgot “Yessie’s AirPods,” but the next time I tried to pair them, the panel said, “Not your AirPods.” I could have connected anyway, but I wanted to have the experience Apple intended. So, I reset the AirPods.

To complete a reset, open the case (with the AirPods inside) and hold down the pairing button for 15 seconds. Then, the interface I mentioned above should appear. From there, it’s smooth sailing.

Look and Feel

Apple is going wireless, and the AirPods show it off beautifully. If you are used to traditional Apple headphones, these will be an easy adjustment for you, as the AirPods are simply a pair of EarPods with the cables cut off. They look and feel almost exactly the same. Even if the EarPods fall out of your ears, these may not. As it turns out, one major reason EarPods fall out of people’s ears is because of the cables. Who knew? Personally, I never had issues with EarPods staying in my ears, and this remains true for the AirPods. I did, however, have a scary moment where one fell out of my ear while doing house work. I would advise extra caution around trash receptacles or anything with a drain, especially for us low vision and blind folks.

Connectivity

The AirPods link together using Apple’s new W1 chip, and maintain two simultaneous bluetooth connections to your device. They remain perfectly in sync, which is really magical. The AirPods are said to have bluetooth 4 with some “special sauce,” but all that matters is that it seems to work really well. They have improved range compared to other bluetooth devices, and they have less audio imperfections. This is great, because for them to be worthwhile, these need to rival the usefulness of traditional or lightning headphones. In my testing, I would compare the range of the AirPods to that of my wireless, not bluetooth, headset with a USB receiver. I am very impressed, and I have not experienced any disconnections, like with traditional bluetooth audio devices.

Functionality

The AirPods can be charged from 0% to 100% in just 30 minutes, and each AirPod can last 5 hours on a single charge, or 2 hours of talk time. The case provides 24 hours of charge, which means these should easily get you through any long commute, or multiple short commutes with no need for lightning cables. When the case does need to be charged, you can easily do so with the included lightning cable, or one of the many others you undoubtedly have lying around. If you ever find yourself in a hurry, a quick 15-minute charge in the case provides the AirPods with 3 hours of listening time, or 1 hour of talk time. You can quickly check the charge of the AirPods, as well as the case with the same interface that pops up when you open the lid. When both AirPods are in the case, they’re listed as “AirPods: X%.” When one is removed, however, they show up as their separate left and right channels respectively. Additionally, you can check the level of your AirPods while you’re using them in the Batteries Widget on your iPhone. It will even tell you if you are using the left or right AirPod, which is a nice touch.

The AirPods can be used independently as a mono headphone, or together as a stereo pair. Switching between mono and stereo audio works really well in my testing. Just take one out of the case, and put it in your ear. You’ll hear it connect, and you can immediately start playing audio. As soon as you remove the second AirPod from the case, it will begin playing audio and you can put it in your ear for a great stereo sound. Removing either one will pause the audio, and you can press play again to continue playing in mono, or put the other headphone in your ear to continue listening in stereo. I love this feature, as it makes it very easy to quickly hold a conversation with someone without the distraction of audio playing in your headphones. Note: You can change any of these behaviors in Bluetooth settings, and even rename the AirPods.

Seamless Switching

On a recent podcast, I mentioned how I love my Plantronics Voyager Edge for its ability to maintain a simultaneous connection to both my iPhone and Apple Watch, and to switch between them as needed. The AirPods are advertised to do the same, without the need to manually pair to each device. However, in my testing, this has been far from consistent.

The AirPods refused to appear as an audio option on my Apple Watch until I restarted. Once I did, the watch connected to them and VoiceOver’s audio came through the AirPods instead of the watch. However, once I switched back to my phone, and tried switching back to the watch, I was unable to get audio to go through the AirPods again. Attempts to connect through Control Center on the watch often failed, which is a huge disappointment.

Additionally, I noticed that with only VoiceOver running, the AirPods would lose connection to my phone when I set it down. I would have to go to Control Center and remind them that they were supposed to be connected. This is also disappointing.

Music Playback

Music playback with the iPhone works really well. It sounds great – slightly better than the EarPods. I can definitely see myself using these quite a bit for listening to music on the go. My only problem? Siri is not a good replacement for actual buttons. I would like volume controls, and a way to skip tracks. Right now, you can only play/pause, and activate Siri by tapping the AirPods. What’s worse is that you have to tap really hard for Siri to activate, and it’s hard to know exactly where to tap. I’m hoping this will get easier with time, but it would be nice if Apple would give us some additional controls for music playback.

VoiceOver Latency?

Admittedly, I am not the best judge of latency, seeing as how I don’t continuously use VoiceOver. However, I will say that when paired with an iPhone, the AirPods are very responsive. I don’t notice much lag at all when typing long messages, or using VoiceOver. Is it as good as wired headphones? I don’t think so, but each person will form their individual opinion about latency. I’ve heard everything from, there’s no latency, to VoiceOver is very sluggish. There are also many factors to keep in mind when testing latency – the device used for testing and the particular use case are two examples of this.

I would also like to point out that MacBooks before 2015 are not setup to support newer standards of bluetooth, so latency is much worse on those machines. Additionally, they do not support wide-band audio, so any calls will have very poor audio quality. This is not the fault of the AirPods.

Conclusion

Apple’s long-awaited AirPods are finally here, bringing with them the wireless future Apple promised! At $159, the price is cheaper than most comparable wireless earbuds, and the functionality is much improved. Of course, this is more true for those of us in the Apple ecosystem, and who interact with Apple devices on a daily basis. If you are an Android user, for example, there are probably better options available for purchase. If you don’t plan to use these with an iPhone, iPod, iPad, or Apple Watch, I would recommend looking elsewhere. I have had a few issues with AirPods when it comes to switching between devices and with losing connection when no audio is being streamed, which is disappointing. However, I feel most of this is caused by long-standing bugs with Bluetooth in iOS, which will hopefully receive more attention now and actually get fixed. As for the AirPods themselves, future updates may include additional functionality – I am hoping for more music controls. With all this said, I believe the AirPods are a great first-generation product. There is room for improvement, but software updates should do the trick! I recommend these to any iOS user who is searching for well-integrated truly wireless earbuds. Embrace the wireless future with me, won’t you?

Is AirPlay from Windows Really Possible?

AirPlay icon consists of a rectangle like a screen with a triangle at the bottom pointing up.

I have had many opportunities to AirPlay things from my phone or my iPad to one of my friends Apple TV’s. I think it is a great experience to use other speakers to play a song you like or use a bigger screen to play a video on.

I know that many Mac users can AirPlay from their computer, but I never thought it was possible to AirPlay from Windows; however, recently I was visiting with some friends and I was looking through iTunes for a song and decided to listen to some music. I wanted to find out who the artist was and tripped over a button that said, “AirPlay,” and honestly, I wasn’t expecting to find the AirPlay button in iTunes for Windows.

I decided to see what options I would get if I clicked on the AirPlay button and, you have it. My screen reader showed me a list of Apple TV’s I could stream to. Being the person I am, I doubted that it would actually stream to one of the TV’s, and if it did it would still my speech as well, but I was really surprised by what I heard. Yes, the music did play. Yes, it sounded really good coming from the Apple TV, and no, it didn’t steal my speech.

Are you wondering how to AirPlay from your iTunes on Windows? Follow these quick steps, and you’ll be jamming out in no time.

  1. Make sure that the computer and the device you want to use is connected to the same Wi-Fi network.
  2. Open iTunes on your computer and start playing music.
  3. When you tab through the iTunes window, you should see the volume, and the next button to the right is the AirPlay button.
  4. Activate the AirPlay button. You will now see a list of available devices. Keep in mind that your computer will be the first option in the list.
  5. Put your cursor on the device of your choice and press enter. It will take a few seconds for the audio to switch but once it does you will be able to adjust the music from your computer.
  6. To return your music back to your computer, repeat steps 3 4 and 5.

I hope everyone checks out the AirPlay options available to you. I will warn you that if you don’t have any available airplay devices, you may not see the AirPlay button on your screen.

Dictation Commands for macOS and iOS

Apple Dictation Logo
Dictation for the Mac and for iOS has changed the way we input text on our machines and phones. Because of this, we need to have commands to add punctuation and capital letters. We have searched the web and have compiled a list of these commands here and they work for both macOS and iOS. These will also work in VoiceMail Transcription and apps like Just Press Record

Dictation Commands

  • All Caps – Completely capitalizes the next word.
  • Caps – Capitalize the beginning of the next word.
  • Upper Case [Letter] – make the next letter upper case.
  • Caps On – This turns on Caps Lock.
  • Caps Off – Turn Caps Lock off.
  • No Caps – No capital letters in the current word
  • Numeral [Number] – This types a number instead of the word for that number.
  • New Paragraph – Create a new paragraph.
  • New Line – Create a new line at the current insertion point.
  • No Space – Force dictation to not put a space between the next word.
  • No Space On – Force dictation to not put spaces after words.
  • No Space Off – Start putting spaces after words.

Punctuation and Special Character Commands for macOS and iOS dictation

  • Period
  • Comma
  • Question mark
  • Reverse question mark
  • Hyphen
  • Dash
  • Em Dash
  • Exclamation Point
  • Underscore
  • Open Parenthesis
  • Close Parenthesis
  • Open Square Bracket
  • Close Square Bracket
  • Open Brace
  • Close Brace
  • Colon
  • Semi Colon
  • Ellipsis
  • Quote
  • End Quote
  • Back Quote
  • Single Quote
  • End Single Quote
  • Double-Quote
  • Apostrophe
  • Slash
  • Back Slash
  • Tilde
  • Ampersand
  • Percent Sign
  • Copyright Sign
  • Registered Sign
  • Section Sign
  • Dollar Sign
  • Cent Sign
  • Degree Sign
  • Caret
  • At Sign
  • Pound Starting Sign
  • Yen Sign
  • Euro Sign
  • Pound Sign
  • Smily Face or Smiley
  • Frowny Face, Frown or Sad Face
  • Winky face or winky

Have we missed any commands or other things to say? Please leave us a comment if you know of commands that are not listed here.

The Future in Microsoft Accessibility

A picture of the Windows Logo

A day ahead of the International Day of Persons with Disabilities, Microsoft highlights improvements planned for it’s products and services for 2017, and the changes seem really exciting.

Windows 10 and Narrator

The Windows 10 Creators Update will include improvements to Narrator. Some of these new changes are already available on Insider builds. Other changes will be available in early 2017. They include:

  • Braille: Microsoft says that the Creators Update will include beta support for braille input and output. There will be support for braille displays from more than 35 manufacturers, and support for over 40 languages. Narrator will support multiple braille variants, including grade 2 contracted braille.
  • Unassisted installation: You will be able to install the Windows 10 Creators Update with Narrator, regardless of weather you are setting up a full installation of Windows, or a portable one.
  • New launching method for Narrator: Microsoft has changed the quick keys used to launch Narrator. Due to feedback from users, you will now launch Narrator by pressing CTRL + Windows + Enter. Narrator can still be launched from Cortana or the Settings Window.
  • New Voices and capabilities: Narrator will gain 10 new voices, and multilingual reading, allowing for seamless switching of languages, as long as you have the corresponding voices installed.
  • Improved audio experiences: Microsoft has implemented something they call “Dynamic ducking,” meaning that Narrator will only reduce the volume of other applications when it is speaking. Microsoft has improved handshaking between Narrator and Cortana. Now, Cortana won’t transcribe what Narrator (or other screen readers) are reading.
  • More general reliability and usability improvements: Microsoft added what it says are “features to make it easier to understand the context of a control with which you are interacting and to make it possible to discover information about objects like the background color of a table cell.” Narrator will maintain your navigation mode across applications. Microsoft has also made some cursor positioning improvements to Narrator. They include “stopping and starting where you expect when reading in scan mode and when reading by line, paragraph and in continuous reading.”
  • Easier web browsing with Edge: The responsiveness of Narrator has been improved. Microsoft has added several new features, including the ability to navigate by forms such as check boxes, text fields or buttons. Heading level navigation is also possible.
  • Improvements across devices: It will be possible to use a controller to “drive Narrator interactions on Xbox.” You will be able to adjust the pitch and speed of the Narrator voice on The Xbox.

Support For Third-party Assistive Technology

Microsoft has said that they are “working closely with partners to ensure that they have what they need to deliver great user experiences with Edge, Office and other Windows apps. And, we continue to offer the Window Eyes screen reader free of charge for customers using Office 365.”

And There’s More

For more information on Microsoft’s other exciting accessibility efforts, check out the Microsoft Accessibility blog at  Making Microsoft Products More Accessible, What to expect in 2017 I might be a Mac guy, but I think what Microsoft is doing with accessibility is amazing, and I’d love to play with it. Maybe one day I might be saying Windows Hello to a Surface. While I can’t see that happening right now, who knows what the future will bring, aside from Narrator? Follow us around the web and let us know what you think. Will you upgrade if you already use Windows? Do Microsoft’s accessibility improvements excite you enough to switch from macOS?

Accessible Gaming: Mac Vs Windows

Apple Zoom Logo

Gaming has been a huge portion of technology since the 1980s, and there has really not been a focus on if low vision gamers could play video games or read text. Now, with built in magnification between operating systems low vision users can finally customize their systems so that text can be read and games can be played, but what OS provides the best experience for gamers who use magnification.

Windows Magnification

Windows Magnifier has greatly improved over the last few versions of Windows and keeps getting better in Windows 10. You can now magnify in full screen on the Windows Desktop, and in some graphical applications. This will also work while in games, but it will not work in many games that run in full screen. If Magnifier is open and zoomed in while games are open then many games will not function properly.

MacOS Magnification

Zoom on the Mac has been on the Mac for around 10 years and has not had the need to change in that time. Zoom has been the first Desktop magnification solution to allow for full screen and lens style magnification, and it works well in desktop applications and in graphical apps. The really impressive feature of Zoom is that it will work within games that run on the same resolution as the Mac with very minimal effects to performance.

Conclusion

While I prefer the gaming experience that is provided on the Mac, there are still more games available on Windows than there are on the Mac, so the choice of which OS to use as a primary gaming platform will still have to be Windows for the choice of games. The good aspect that Steam provides is that you can buy games from Steam and get the game for both Windows and MacOS.

Unlock Your Computer With Windows Hello

Windows Hello Logo with text of Windows Hello and Windows 10 logo

These days, we’re always trying to find the most convenient ways to get access to our technology. Some computers come with finger print readers, and most have built in cameras. Microsoft takes full advantage of this with Windows Hello!

With Windows Hello, you can use your face, iris, or fingerprint to access your information on your device. As long as your device has a fingerprint reader or camera that Windows Hello supports. You can also sign in to your computer with Windows Hello companion devices. Some of these devices are specific and can include Microsoft Band and Windows phones.

How to enable Windows Hello

  1. Go to start and select settings.
  2. Go to accounts and then sign in options.
  3. Select Windows Hello.
  4. Select whether you want to add your face, iris o fingerprint. We are going to use fingerprint in this example, but the steps are the same.
  5. Select add another.
  6. Follow the prompts to touch your finger to the print reader. If you are using a screen reader, you may need to use Narrator to hear those prompts.
  7. Once your first print is in the computer, you will be asked to enter a pen. This is another way of verifying yourself if you are not able to use the print you have entered.

Why use Windows Hello?

I have read many articles that say that with the invention of Windows Hello, passwords will become a thing of the past. Windows Hello will also tie in with Windows Passport, making it possible for one person to sign in to their computer without inputting a password or pin number.

I think Windows Hello is a step in the right direction for Microsoft. I hope that more devices will become compatible with this feature.

Sling’s Accessibility should be in a Sling.

The Sling icon

Sling TV is an online cable service that brings cable TV channels to your smartphone, tablet, and computer. While Sling TV brings much to the table like affordable plans and a 7 day free trial, their accessibility and app features have much to be improved upon. Lets take a look at both of these things.

Sling Accessibility

Sling TV allows for users to sign up and sign in to the app, but the accessibility stops there for the most part. While users can find the menu and guide, a user can not browse the channel listings that are in the app. Visually, the channel listings are in a scrollable control that slides left and right and once an option appears in the middle of the screen then that channel’s listings appear. This functionality does not work with VoiceOver, and the schedules will also only tell the times that something is to be shown. The show title only appears as an image with no alt text included.

Sling TV App Features

While iOS has moved on the Sling TV app has not. While using the Sling app on iPad I noticed that they do not support Picture in Picture support at this time, and the interface is still that of an iOS 7 app that does not scale with size classes as most modern apps do.

Conclusion

While Sling TV provides a great online based cable TV experience, it still lacks features that other services provide, and VoiceOver users will find that the app lacks the accessibility required for everyday use. As a low vision user I plan to continue my subscription after my trial, but milage will vary when this app is concerned. Hopefully support for accessibility and feature sets will improve when single sign on and the TV app are released to the public because they both support Sling TV.

VO Starter 3.0 Public Beta

VO Starter App Icon

iAccessibility is proud to announce that VO Starter 3.0 is now in the Beta phase of development. As such, we are offering the opportunity for a public beta test through TestFlight. If you are interested, please fill out the form below and you will receive a TestFlight invite in your email. We will remove the form if or when we run out of testing slots. We hope you enjoy the app.

Google Home First impressions

Image of a Google Home

We are entering a market where the internet connected products that is controlled via voice is starting to get competitive. Up until now Amazon’s Echo has been the well-known product on the block. Now, in November 2016, Google Home is released. In this review, I hope to talk about how Google Home stacks up against Amazon Echo.

Unboxing and Setup

Unboxing the device, you find the unit, the power cable and some printed cards telling you about the Google Home app which you can download for iOS and Android. Physically, the device looks like an enlarged air freshener. You have one button on the back which controls if the microphones are on and off. You also plug in the AC cord on the back of the device. The base of the device is removable should you want to purchase additional bases. The base attaches magnetically and it covers the area where the speakers are located. On the top, you have a touch panel that you can use to adjust volume by moving your finger in a clockwise or counter clockwise direction, also you can start and stop media via this touch panel by tapping the touch panel with one Finger.

Setup

Once I plugged in the Google Home, I got the Google Home app on my iPhone 7 Plus. Setup was simple, I signed into my google account and connected the home to wifi. I was also able to link my Google Home with Spotify for music playback.

What Can you Do with Google Home?

You can do a lot of the same things you can do with Amazon Echo including ask for the time, the weather, tell me a joke, set alarms etc. You can play music and podcasts as well. You use “OK Google” as the phrase to wake it up.

Some things that are different include playing games like a trivia game show, it can walk you through the completion of madlibs and you can ask the crystal ball what your future holds. I found those quite fun I must say. The Home is also very conversational. For example when I asked it Who Is Donald Trump”?   I then asked, “When was he born?” The Home knew I was talking about Donald Trup from my last question. That is something that currently, Amazon Echo does not do at the time of this writing.

Things I Did Not Like

I did not like the speaker. It was mono which to be fair, so is the large Echo. However, I found it muffled and just not suitable for my ears for any music playback. You do get some bass and some highs, but overall, I just did not like the sound of the speaker. I hope in future we see a new home with much better sounding audio or the ability to use your own audio like you can with the $50 Echo Dot.

I also think the platform needs to mature, which to be fair, the Echo had to as well. The Echo has a wealth of skills and other things you can do at this point. I hope we see developers embracing the home platform going forward. I found at this point in 2016, everything I tested on the Home feature wise, my current Echo and Echo dot can do. I will be watching this platform as time goes on.

Pricing

The Google Home is $130 US. Below, find the link if you wish to purchase a different base.

https://store.google.com/product/google_home_base

First Look: 13 Inch 2016 MacBook Pro without Touch Bar

image of MacBook Pro 2016 from iMore.com

Last week I had the chance to check out the 2016 MacBook Pro that is 13 inch without the new Touch Bar, and my thoughts on this machine are mixed. Here is what I observed.

Chasis

The 2016 MacBook Pros come in what feels like a new type of anodized aluminum unibody case. This case does feel stronger and more smooth than other models, and the Space Gray does look nice for a MacBook Pro.

Display

The new display on the MacBook Pro  is noticeably brighter, and thinner. It is so think that they removed the backlit Apple Logo to make the display thinner, which is not my favorite decision as the light up Apple logo is iconic to Apple’s product line.

Trackpad

The new trackpad on the 2016 MacBook Pro is considerably bigger than previous models. This allows for the user to have more working area to use for the ouse. One thing I noticed is that this makes there be less of a hand rest for proper typing, so one could not easily rest their hands on the MacBook without accidentally moving the mouse if a finger or palm hit the trackpad.

Keyboard

Apple has changed their laptop lines to use a new keyboard that uses better key design and prevents typical keys from breaking. These keys are flatter, and do not have as much key travel as previous keyboards. If you are familiar with the 12 inch MacBook then you will be familiar with this keyboard. I personally do not like the amount of travel the keys have, so I find it difficult to type on this keyboard. The keys do have slightly more travel then the MacBook, but they still do not have the amount of travel that comes on the 2015 MacBook Pro, which can be an issue for some. Many are able to adapt to these keys but many including myself prefer the previous keyboard style.

Ports

The 13 inch MacBook Pro without the Touch Bar comes with 2 USB-C/Thunderbolt 3 ports on the left side, and a headphone jack on the right. These ports are incredibly fast and powerful, but they are actually difficult to feel on the side of the machine to line up the device you are plugging in. This allows the machine to be thinner, but this may be an issue for users with low feeling in the fingers. With this model of the Pro, we also see the removal of the MagSafe charging port. On this model of the computer, one charges the machine by plugging the charger into any of the new USB-C ports. This now adds the risk of tripping over cables and pulling your computer off of whatever surface it is resting on.

Conclusion

The 2016 MacBook Pro strives to take us into the future with new display, keyboard, and connectivity technologies, but to do so, Apple has had to make sacrifices that remove features that users are used to having like standard USB ports, and a keyboard with more travel. In a few years we will not notice these changes and we will just accept them as standards, but until then it will be a rocky transition with a lot of cables hanging off of our MacBooks.

Zooming in on the Touch Bar

image of MacBook Pro 2016 from iMore.com

We’ve already talked about how VoiceOver works with the Touch Bar on the new MacBooks, but what about low vision users? How could Apple possibly make items on such a tiny screen usable by the visually impaired? It’s called Touch Bar Zoom, and we’re going to tell you all about it.

What’s Touch Bar Zoom?

Much like Zoom on the Mac, Apple TV, iPad, iPhone, and Apple Watch, Touch Bar Zoom magnifies elements, making them easily accessible to everyone. Since the Touch Bar is small, Apple opted to show a zoomed version on screen whenever it’s needed. Once the user has selected an option, the icons disappear from screen.

How to Enable or Disable Touch Bar Zoom

  1. Click the Apple logo in the menu bar.
  2. Click “System Preferences.”
  3. Click “Accessibility.”
  4. Click “Zoom.”
  5. Click the checkbox next to “Enable Touch Bar Zoom.”

To disable Touch Bar Zoom, follow the steps listed above, and deselect the checkbox.

Note: Touch Bar Zoom is not available while VoiceOver is running, due to conflicting gestures.

How to Use Touch Bar Zoom

To show the Touch Bar on screen, hold one finger on the Touch Bar. Note: Simply tapping it will not work.

If the version of the Touch Bar shown on screen is either too small or too large, you can adjust the zoom level. This is done by holding down the command key, and performing the pinch to zoom gesture on the Touch Bar. Just as it does on iOS, bringing the two fingers closer together (pinching) will zoom out, and spreading the fingers apart will zoom in.

How to Select Items

Holding one finger on the Touch Bar will show it on screen. Then, slide your finger to the item you wish to select. The circle surrounding it on screen will change color, and then you can lift your finger. Alternatively, you may split-tap items to select them. To do this, touch and hold an icon you wish to select, then tap the Touch Bar once with another finger.

Conclusion

When the new Macs were just rumors, we were concerned that low vision users would be left out in the cold. However, we really should have known better. Regardless of what accessibility features a user needs, the Touch Bar is completely accessible. We wish Touch Bar Zoom would work with VoiceOver, but we believe this is a great start. We cannot wait to get our hands on the new MacBooks!

Featured image from iMore

Back to Top